• About Me
  • About the Name
  • Recipe Index
  • On Top Of Spaghetti… στα Ελληνικα!

On Top Of Spaghetti

~ …All covered in cheese!

On Top Of Spaghetti

Category Archives: Cakes and Baked Goodies

Mince Pie Thumbprint Cookies

23 Monday Dec 2013

Posted by On Top Of Spaghetti in Cakes and Baked Goodies, Dessert

≈ 8 Comments

Mince Pie Thumbprint CookiesHow about a really really quick post? I feel awful about the way I am neglecting my little Spaghetti blog, and I was just over at The Foodie Corner writing this recipe when I suddenly thought this is too good not to post here as well.

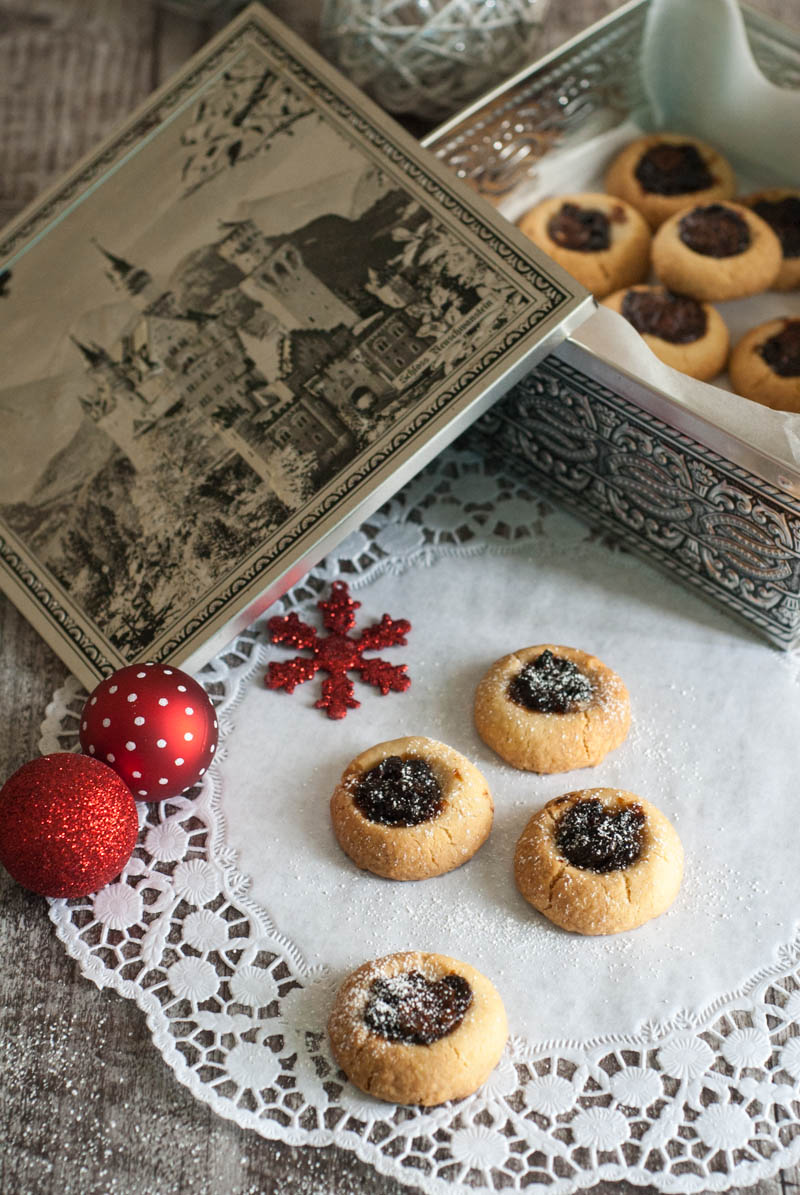
A few days ago I was in the middle of making mince pies and was getting a bit frustrated with the whole muffin tin pie dough combo, when it suddenly occurred to me that the dough I was handling would probably behave better as a biscuit (as in cookie for my US friends). Then I got an image of a thumbprint biscuit in my mind and decided that a blob of mincemeat would look pretty cute (and taste pretty good too). So, the rest of the dough was rolled into little balls and transformed into these little cuties. Bite sized mince pie biscuits that you can enjoy with a cuppa or plop in a bowl and devour with lashings of cream. Just like a proper mince pie, minus the faff.

The mincemeat I used was the Thursday Cottage brand which is pretty amazing. Even more amazing is the fact that you can get it in Greece! The pastry is lovely and sweet so they make a great pair. I have managed to keep a few of these and I’m hoping I can stay away from the biscuit tin long enough to enjoy them on Christmas Day. Now I have to go because just thinking of them is making that pretty difficult…

Have a wonderful Christmas and a fantastic New Year everyone!

Mince Pie Thumbprint Cookies

(Original recipe for mince pies is from the BBC Good Food magazine)

Ingredients

300gr mincemeat
75gr dark chocolate, chopped
375gr cold butter, cubed
600gr all purpose flour
225gr brown granulated sugar
icing sugar for sprinkling (optional)

Instructions

1. Mix mincemeat and chocolate in a bowl and set aside.
2. Place butter and flour in a large bowl and rub with your fingers till it resembles crumbs. Add the sugar and squeeze with your hands till the mixture forms a dough. It will be very crumbly to start with, be patient and keep kneading till it comes together.
3. Preheat oven to 200C (180C fan). Make little balls of dough and place them on lined baking trays, spaced apart. Press the back of a round measuring spoon into the top so that the ball is flattened slightly and an indentation is formed. If you don’t have round measuring spoons use your thumb. Fill each indentation with some mincemeat but don’t let it spill over. Bake for approx. 15 to 20 minutes, depending on your oven and the size of the cookies. Start checking after 10 minutes. They should be a light golden colour.
4. Remove from the oven and let them cool on the tray (they will continue to cook for a little while). When completely cool sprinkle with icing sugar if desired.

Note: This is not a sponsored post and I have received no compensation or free products for mentioning the brand. I just thought it was really tasty and you all deserve to know that!

Easy Bougatsa (Greek Custard Pie)

27 Wednesday Nov 2013

Posted by On Top Of Spaghetti in Cakes and Baked Goodies, Dessert, Pies, Quiches, Frittatas

≈ 15 Comments

Tags

bougatsa, custard, dessert, fyllo pastry, Greek, sweet

Easy Bougatsa (Greek Custard Pie)
If you’ve been to Greece, chances are you’ve tried bougatsa. Maybe for breakfast one morning before hitting the beach? Or after stumbling upon a small bakery with a batch of pies fresh out of the oven? Bougatsa is the one with the fyllo pastry wrapped around a thick creamy white custard, with icing sugar and cinnamon sprinkled on top. It’s good. It’s very very good.

Luckily there’s a way to make it easily, without faffing around with buttering flimsy sheets of pastry that dry out if not kept under a damp towel, etc etc. Some people call it the lazy woman’s bougatsa. I’m not sure about you, but any recipe with the words “the lazy woman’s…” in its title, is going to get my attention.

This particular recipe is ridiculously easy. I should say dangerously easy, as whipping up a dish of this bougatsa with such little effort could mean ill-fitting jeans are in your imminent future. And it keeps well in the fridge; in fact it gets better during the two days after it’s baked. However, I have very kindly made a small batch here, so it shouldn’t do too much damage. Unless you make it every two days!

The original idea to make this came from the blog Funky Cook (in Greek) and the recipe I used is from the blog Sugar Flowers Creations (in Greek).

Easy Bougatsa just out of the oven

Easy Bougatsa (Greek Custard Pie)

Ingredients

250gr fyllo pastry
125gr butter, melted
3 eggs
1/2 c. milk
1/2 c. sugar
1/2 tsp vanilla extract
icing sugar and cinnamon for dusting

Instructions

1. Lightly grease a rectangular baking dish (mine is 25x16cm) and preheat your oven to 180C. Take each sheet of pastry and gather it/bunch it up widthways. Put one sheet next to the other in the dish, bunched up. (If this doesn’t make much sense you can check the pictures in the original recipe here, and also here.)
2. Drizzle the melted butter over the pastry in the dish. Pop it in the oven and bake for about 10 minutes or until it starts to go a golden colour.
3. While the fyllo is baking, beat the eggs lightly and add the milk, sugar and vanilla. Whisk until smooth. Pour the egg mixture over the half-baked fyllo. Move the dish a bit so it’s distributed evenly and return it to the oven.
4. Bake for another 20-30 minutes, or until golden. Let it cool slightly.
5. To serve, sprinkle with icing sugar and cinnamon. I did that separately for each portion at the time of serving. Store it in the refrigerator but it’s best served warm (about 15 seconds in the microwave will do the trick nicely for each individual piece).

Note: If you want a proper sized bougatsa pie, double all the ingredients execpt the eggs, of which you will need 5.

Other classic Greek desserts
Galaktoboureko by Elena’s Cooking
Cream Horns from Sabor by Conna
Samali from Sabor by Conna

Mini Dukan Lemon Cheesecakes and a Sneak Preview of The Foodie Corner

19 Thursday Sep 2013

Posted by On Top Of Spaghetti in Cakes and Baked Goodies, Dessert, Dukan Diet Friendly

≈ 11 Comments

Tags

baking, cheesecake, dessert, diet, dukan, Dukan diet friendly, egg, Greek yogurt, lemon, low fat, oat bran

The Foodie Corner logoLike it? The Foodie Corner is soon to become a reality. From wire frames and sample pages to a real live blog. Just a few weeks (or even days) away now! I know most of you won’t be able to follow me there as it’s going to be in Greek (unless you’ve been taking lessons?) but I really wanted to share this image here so you guys have a small sneak preview of what is to come. I have no intention of dropping On Top Of Spaghetti, and after the first few months of ups and downs I aim to be back blogging here as often as possible. In the meantime, what do you think? Cool isn’t it? I have been working with a fabulous team of designers and developers, whom I will introduce in a later post (when you have more than just the one image to see!). They have done such a great job. So I’m adding this little gem of a picture to my side bar!

At first I thought I would just post this without a recipe. But you know me. Can’t write anything on here without sharing something delicious. And today I have an extra special treat; a Dukan dessert. I’m not on this diet anymore, but once in a while I will have a Pure Protein day (or two) because it makes me feel better. Just to remind you, the diet is based on protein and vegetables, cutting out fat and carbs. I know the human body needs fat and carbs, but this human also needs to fit into certain jeans. So a little Dukan Attack here and there won’t kill me. Also, I enjoy thinking up recipes that will help those who are on the diet. Like this one!
Mini Dukan Lemon Cheesecakes
These mini Dukan lemon cheesecakes are based on two recipes. The first is for Dukan cookies, which I thought could be my base if made in mini form (digestives and graham crackers are sadly not allowed!). The second is a lightened up version of lemon and blueberry cheesecake using lemon flavoured yogurt, on the blog “Whatever Gets You Through The Day”. Iris took part in a challenge and used a lemony yogurt to create this lovely looking dessert. It’s pretty light as it is but not quite suitable for the Dukan Diet, so I got to thinking of ways to adapt it. There is a dairy company here in Greece called Mevgal, which produces this amazing 1% lemon yogurt. It’s like no other I’ve ever tried. (And I’m not getting paid or compensated in any way for saying that! I just love it.) For a while now I’ve been thinking of making some sort of cheesecake with it, and this seemed like the perfect opportunity. So, with a bit of mixing and matching, I came up with these babies! I still can’t believe how close they are to real cheesecake! Ok, the base is not like a biscuit base, it’s much softer and -let’s be honest- not as tasty, but it does provide a nice contrast to the lemony filling. When I offered one to The Mister he didn’t believe they were Dukan approved, he was worried that at 23:50 I had finally given in and spoiled the Pure Protein day. Now that was a good sign. I had quite a bit of leftover filling because my mini muffin pan is very mini. So I just poured it into ramekins and baked it alongside the little guys, without a base. This too was very nice, I’ve just finished one now. Just sweet enough and very cheesecakey! This morning I had one with a teaspoon of raspberry jam on. Mmm! But that’s only for non-Dukaners. Right, I’ve gone on about this too much. Here is the recipe!

Mini Dukan Lemon Cheesecakes

Ingredients

For the base
1 egg
3 Tbs oat bran
1 tsp baking powder
1 Tbs Splenda or equivalent sweetener
2 Tbs plain yogurt (mine was 1.5% fat)

For the cheesecake filling
1 x 200g pot lemon flavoured Greek yogurt (mine was 1% fat)
100g low fat cream cheese (mine was 5% fat – a tiny cheat as it should be below 2%)
1 Tbs oat bran
1 tsp vanilla extract
1 Tbs Splenda or equivalent
2 egg whites (mine were pretty large)

Instructions

1. Preheat oven to 180C (160C fan)
2. For the base: Mix all the ingredients in a bowl. Pour mixture into a non-stick 12-hole mini muffin tin (a regular muffin tin would work too, you’d probably get 6 or 8). You only want a little bit of mixture in the bottom of each mould, remember this is the base. Pour any leftover mixture into individual muffin moulds, you can make more cheesecakes or leave them plain – they would be lovely with scrambled egg!
3. Bake for 10-15 minutes till lightly browned (see note at end).
4. In the meantime mix all the filling ingredients together (you can use the same bowl for less washing up! yay!).
5. Take the muffin tin out of the oven and pour filling over each little oat bran base. Fill to the top, these will rise a little then fall back down. Pour any leftover mixture into some ramekins or over the stray muffins from above. Pop them back in the oven for about 20-25 minutes till set and lightly browned (see note).
6. Take out of the oven. You will be excited at how nice and fluffy and risen these will look while baking; be prepared to see them sink back down! But that’s ok because they taste good.

Note: I think with these times mine turned out a little overbaked as they were sliiiightly dry. This might just be due to the ingredients, especially the oat bran, but I think it was the time in the oven. Iris made a whole cheesecake and baked hers for 25 minutes so I think my tiny muffins really didn’t need that long! I liked the fact that they were browning (goodness knows why) and left them, but next time I will check at 15′ by touching the surface. If it’s set I’ll take them out. Don’t forget the base has already been cooking quite a while.
Also noteworthy is the fact that these are much better the day after! Sounding all the more like proper cheesecake!

Plum Crumble with a Hit of Chilli Honey

23 Friday Aug 2013

Posted by On Top Of Spaghetti in Cakes and Baked Goodies, Dessert

≈ 16 Comments

Tags

baking, chilli, cream, crumble, dessert, fruit, Gran Luchito, honey, oats, plum

Plum crumble in a baking dishIntrigued by the title? I’ll get right to the point. One of the best things I tried at the FBC5 food blogger conference was the Gran Luchito Smoked Chilli Honey. I spent quite some time skulking around the Gran Luchito food stand during the breaks, trying to look inconspicuous while eyeing the crackers and cheese, ready to pounce as soon as there was a tiny bit of space among the crowds. I would grab a chunk of cheese, pop it on a cracker, and smother the whole thing with the smoked chilli honey. Then I’d walk away, wait 3 minutes and go back, hoping the lovely girl at the stand had forgotten me. I’m sure she must have been rolling her eyes every time!

May I just say at this point that this is not a sponsored post or anything. I just loved that stuff. It’s made with a special type of rare Mexican chillies. Now, it is actually possible to order it on Amazon, but the postage to Greece for one jar is more than what I paid for a big box with an electrical appliance in it a couple of weeks ago. So, having been lucky enough to snap up a sample of the Smoked Chilli Paste (the base for the honey and the gorgeous Gran Luchito Mayo) I decided to improvise and made my own. It was not the same, but it was still very good. Greek honey is top quality and the paste packs so much amazing smoky flavour that the result was far from disappointing. Ever since trying it in London, I’ve been thinking I would like to add it to a dessert. Don’t ask why, it just stuck in my mind. When I recently found myself with a batch of wonderfully ripe and juicy plums, I had one of those light bulb moments. Macerate them in this honey, cover them with a dark sugar and oat crumble, and bake. It just sounded so right. And it was. So so right. Every once in a while I have some bloody good ideas – if I may say so myself!

In case you are worried, this is not spicy hot. You can’t really tell there is chilli in it. But it gives the fruit a depth and warmth that is hard to explain (wow, depth and warmth… I’m becoming a real food writer… I’ll be saying the flavour “pops” next). But seriously, depth and warmth are the closest I can get to helping you imagine its awesomeness (aaand the writer has left the building).

Plum Crumble with a Hit of Chilli Honey

Ingredients

For the fruity bit

60g clear runny honey (sorry, I forgot to measure in Tbs – I think that’s about 2?)
1/8 tsp Gran Luchito Smoked Chilli Paste
500g (7 smallish) ripe plums, cut into quarters
1/8 tsp nutmeg
1 Tbs all purpose flour

For the crumbly bit

½ cup (8 Tbs) rolled oats
4 Tbs dark muscovado sugar
4 Tbs white granulated sugar
5 Tbs all purpose flour
1/8 tsp salt
4 Tbs cold butter, cut into cubes

Instructions

1. Mix the honey and chilli paste in a medium sized bowl and heat in the microwave for 15 seconds or so, just so it liquefies a little.
2. Toss the plum pieces in the honey so they are all coated and set aside for half an hour or so to macerate, mixing once in a while.
3. Preheat oven to 180C (or 160C on fan).
4. In another bowl mix the dry crumble ingredients, then add the butter and rub with your fingers till the mixture resembles coarse crumbs.
5. Add the nutmeg and flour to the plums, and mix well. Pour into a pie dish or pyrex dish, and sprinkle the crumble mixture over the top.
6. Bake for approx. 30 minutes, till the top looks crispy and the fruit is bubbling up the sides of the dish.
7. Serve with cream. Or try mixing a little bit of single cream into a tub of mascarpone and using that. You’ll like it (unless there is something seriously wrong with you – sorry).

Note: Obviously if you are lucky enough to get your hands on some Gran Luchito Smoked Chilli Honey, you can use that instead of making your own. Or you can just send it to me, I don’t mind.

Other wonderful looking plum crumbly things
Plum Crumble by Orangette (it has ginger in it!)
Plum Crumble Bars by The Cilantropist
Hazelnut Plum Crumb Tart by Smitten Kitchen

Spanakopita Muffins

28 Friday Jun 2013

Posted by On Top Of Spaghetti in Breakfast, Cakes and Baked Goodies, Meatless

≈ 24 Comments

Tags

baking, feta, Greek, greens, muffins, spanakopita, spinach, vegetables, vegetarian

A row of spanakopita muffins lined up on a pretty plate, placed on a red and white striped table clothThis is my 50th post so in order to commemorate the occasion, I thought I would create an index page with all the recipes. I didn’t do one from the beginning because it would look a bit sad with just a few lines under each category. 50 posts in over a year is not really that great, but it’s ok considering it’s just a hobby. Food blogging is very time consuming, it’s not like other types of blogging. You have to find the recipes (either by researching or waiting for inspiration), do the shopping, do the cooking and plan very well so you can take photos before eating everything (this is not easy as artificial light is not a food photographer’s friend – which pretty much rules out dinner time pics). Then you have to try and make the photos look decent (in my case), then write something to go with the recipe, and finally, research other similar recipes from blogs in order to “share the love”. This is not compulsory, but it was suggested to me by an experienced blogger and I agree that it’s a great idea. One thing (of the many) I love about this world is how non-competitive it is. Everyone is encouraging, friendly and helpful, without the “if I help you then you will steal my readers” type attitude. Fellow bloggers, thanks for being lovely people!

So, take a moment to glance at my recipe index. The recipes have been grouped according to blog category; if anyone has any suggestions as to how I can make my categories more user friendly, I am open to ideas. (Update: Oh, and a quick word of advice, don’t leave it till there are 50 posts. My hand aches…)
A long pretty plate with spanakopita muffins lined up
Of course I couldn’t post an article without something yummy attached, so here are the Spanakopita Muffins I mentioned in my previous post, served at The Mister’s surprise party. They are ridiculously easy to make, and offer with each mouthful a burst of spanakopita wonderfulness – minus the hassle of pastry. Don’t get me wrong, I adore pastry of all kinds. I could live on pastry alone (that’s probably why I’m now on a diet again…) but I don’t adore making it. It’s kind of intimidating… Anyway, moving on… This recipe is based on one by Eleni Psihouli, a well known Greek journalist turned cooking show hostess and food blogger. She made this as a cake, with double the ingredients.

Spanakopita Muffins

Makes 12 muffins

Ingredients

180g spinach, washed and roughly chopped
125g all purpose flour
1 tsp baking powder
1/2 tsp salt
1/4 tsp freshly cracked black pepper
1/8 tsp nutmeg
2 eggs
100g Greek yogurt – I used 2% fat
1/2 cup olive oil
1 spring onion, chopped
1/2 cup chopped dill weed
200g feta cheese

Instructions

1. Preheat oven to 180C and place paper muffin cases in a 12 hole tin.
2. Heat a non stick frying pan on medium high, add the spinach and cook for a few minutes till just wilted (without oil).
3. In a large bowl, mix the flour, baking powder, salt, pepper and nutmeg. I find the best way to do this is to use a whisk.
4. In a medium bowl mix the eggs, yogurt and olive oil till incorporated. Add to dry ingredients and fold in.
5. Add the onion, dill and spinach, and crumble in the feta cheese (keeping the pieces fairly big so they don’t melt during cooking). Mix till just incorporated.
6. Scoop into muffin tin (best way is to use an ice cream scoop) and bake for about 15-20 minutes, or until a toothpick comes out clean (double check in case the toothpick went through a piece of feta!).

Notes:
– Instead of all spinach you can mix in other greens such as kale or chard too. Whatever you fancy! The original recipe had parsley in as well, I didn’t have any.
– These muffins come out quite oily! I wondered if it would have been best to use less oil, but in the end I think this helped them keep really well. Plus, proper spanakopita has tons of oil.
– Don’t expect them to rise much.
– The spanakopita muffins freeze fantastically well.

More mini spanakopita treats from other blogs
Spanakopita Strudels by Alexandra’s Kitchen
Broccoli Spanakopita by Steamy Kitchen
Spanakopita Triangles and Then Some by Smitten Kitchen (some gorgeous looking fillings there)
Easy Spanakopita Bites by Iowa Girl Eats (I can’t get over the ready-crumbled feta!)

Beetroot Brownies for Jamie’s Food Revolution Day Picnic

27 Monday May 2013

Posted by On Top Of Spaghetti in Cakes and Baked Goodies, Dessert

≈ 4 Comments

Tags

baking, beetroot, brownies, cake, chocolate, dessert, picnic

a stack of beetroot brownies on a pretty white plate with pointy cornersHello there! It’s been a while… again. But I have a good excuse! We’ve moved house. Yup, we now live in an area outside the city on the coast – a 5 minute walk from the beach to be exact. For Athenians this is considered “a village”! Oh but it’s so lovely. See? a little palm tree on a lawn next to a sandy beach The move was an experience. I’ve moved house several times in my life, 9 to be exact – not counting my years at University in England and not counting the time when I was little and we started moving to a flat up the street only to find the fridge didn’t fit through the kitchen doorway. My mum just took everything back to the old flat that same day! I must say, this time was very easy. We hired professionals to do all the work; packing, dismantling, transporting, the works. The hardest part for us was trying to stay out of their way. Check out their fantastically clever wardrobe box! a cardboard box with a rack for hanging clothesAfter all 9,000 boxes were brought to the new house however, that’s when the tricky part for us started. Two weeks later and I’ve managed to get rid of all but four of them. Unfortunately, one of these contains my tupperware; it doesn’t fit in the kitchen, and I can’t live without it. So I have several trips to IKEA planned in a quest to find the right storage contraption. Any excuse to go get a hotdog!

A few days after the move, I got a message from a Greek food blogger friend (Wonderfoodland) inviting me to a picnic she and two other bloggers (Funky Cook and Sabor by Conna) were organizing for Jamie Oliver’s Food Revolution Day. FRD is an initiative to help raise awareness about eating healthy meals made from scratch. I had to choose from a list of fresh ingredients and make something to take with me. Luckily beetroot was on the list, so I got to try something I’ve been meaning to for a while now. Beetroot brownies! I used a recipe I found on Milk & Honey, which is very easy and requires a minimum of cooking utensils (crucial for me at the time). The only thing I did differently to the original recipe was leave it to bake for longer, as I wanted a more “cakey” brownie rather than a very fudgy one (easier to eat while sitting on a blanket in a park!). What a great day it was! It was so cool to meet fellow bloggers who are based here in Greece, I really hope to see more of them in the future. As with all foodies, they are a supportive and welcoming bunch, always ready with a good word!

picnic shots of brownies, savoury tart, pasta salad and cherry pie

Photos by Wonderfoodland

Beetroot Brownies for Jamie’s Food Revolution Day Picnic

Ingredients

250g unsalted butter
250g dark chocolate
250g cooked beetroot (I use the vacuum packed type – make sure it’s not preserved in vinegar!)
3 eggs
250g white sugar
1/8 tsp salt
150g self-raising flour

Instructions

  1. Preheat the oven to 180C (or 160C on fan mode). Grease a baking tin and line it with grease proof paper, making sure the paper overlaps the long sides (creating a handle to pull out the brownies when cooked). My tin is 18×24.5cm (7×9.5”).
  2. Place the butter and chocolate in a bowl and melt in the microwave (in 30 second blasts, mixing after each blast). Alternatively, melt in a small saucepan over low heat, keeping a constant eye on it so it doesn’t burn. Let cool slightly.
  3. Cut the beetroot into pieces and whiz in a food processor until smooth. Set aside.
  4. In a large bowl beat the eggs and sugar till well combined and lighter in colour.
  5. Add the chocolate mixture to the eggs slowly, while mixing constantly. Be careful if your chocolate is still very hot, you don’t want to cook the eggs!
  6. Sift the flour and salt over the bowl and fold it in carefully.
  7. When almost no flour is visible, fold in the beetroot until just incorporated. Don’t overmix. The batter will be quite runny.
  8. Pour the batter into the tin and bake for 35-40 minutes if you want fudgy brownies, or about 50 minutes for cakey brownies. After 50 minutes my toothpick came out dry from some spots, slightly moist from others.
  9. Let the brownies cool in the tin for 10 minutes or so, then lift out using the paper “handles” and place on a wire rack. Mine were gorgeously moist (not gooey), even with the extra baking time.

Instead of other beetroot recipes, I am listing a few of the blogs that participated in the picnic. There were several more but I didn’t get a chance to chat with them. Take a moment to visit these guys; they are doing a fantastic job!
Wonderfoodland (picnic organiser) – posts in both English and Greek (her savoury tart with feta, tomatoes, onion and olives is pictured above – recipe not online yet)
Sabor by Conna (picnic organiser) – posts in both English and Greek
Funky Cook (picnic organiser) – posts in Greek
Elena’s Cooking (picnic attendee) – posts in English (Pasta Salad with Zucchini pictured above)
Donkey & The Carrot (picnic attendee) – posts in both English and Greek (Cherry Pie pictured above)
Food Daily (picnic attendee) – posts in Greek

For more photos of yummy picnic food, or in case you really want to “Like” it, head over to the Food Revolution Day Athens page!

Salted Caramel Brownies and a Forgotten Birthday!

24 Sunday Feb 2013

Posted by On Top Of Spaghetti in Cakes and Baked Goodies, Dessert

≈ 10 Comments

Tags

baking, brownies, chocolate, salted caramel

two star shaped and one heart shaped brownies on a long white serving platterI feel terrible. I actually forgot my blog’s first birthday. That’s almost as bad as forgetting my child’s birthday! Ok, maybe not that bad, but still… Other bloggers do giveaways, others bake themselves cake… I not only forgot the day (which was the 5th), I also haven’t even blogged for a whole month. Inexcusable! As a belated Happy Birthday (at least it’s still February) I baked myself some brownies. Not just any old brownies mind you. No, these are extra decadent, extra sweet, extra fattening and extra delicious. They have a layer of melty, sticky, gooey caramel oozing out of the middle. Uh huh. Yup. Caramel. To be precise, salted caramel. Even better. Check out the golden stuff trying to escape from within the chocolate sandwich of fudgy-in-some-spots, crunchy-in-other-spots, brownie layers.
heart shaped chocolate brownie with salted caramel oozing from within.
And how about those shapes? Clever or what? Another idea I wish I could call my own. In fact it’s Smitten Kitchen’s, the blog that made me want to try making these. Cut the brownies with biscuit (cookie) cutters! Not only do you get great shaped brownies, you also get a whole load of bits left around the edges that need cleaning up. Unfortunately/fortunately you just can’t serve these bits to anyone. I’m sure you know where I’m going with this… (yes, I ate ALL the straggly bits myself).

a star shaped caramel brownie with caramel sauce oozing out of the centreAfter getting the initial inspiration from that blog post, I thought I would skip making caramel from scratch and try using up a bag of caramel sweets I’d had stashed away for ages. I bought the sweets after seeing a recipe somewhere for something, then promptly forgot what and where that recipe was. So the sweets have been patiently waiting their turn to be transformed into a gorgeous dessert. I did some more research and found this recipe on She Makes and Bakes. Perfect. The only change I made was to use 3 tablespoons of evaporated milk in the caramel mixture, instead of cream. I couldn’t bring myself to open a carton of cream just for a couple of spoonfuls. For some reason I don’t have the same sensitivities about plain old evaporated milk. My next mission is to research whether I can freeze it – I’ll let you know!

Salted Caramel Brownies

Ingredients

1/2 cup (115g) butter
180g dark chocolate, chopped (or chocolate chips)
3/4 cup sugar
2 eggs
1/2 Tbs vanilla essence
1/2 cup + 2 Tbs plain flour
1/4 tsp salt
200g milk caramel sweets (the square, quite hard ones)
3 Tbs evaporated milk (not sweetened condensed milk)
1/4 tsp + a pinch of sea salt

Instructions

1. Preheat oven to 180C. Line a baking tin with foil, leaving some foil overlapping two sides (you’ll use this to lift the brownies when cooled). My tin is 18×24.5cm (about 7×9.5″), you don’t want anything much bigger than that. Spray lightly with cooking spray.
2. Melt butter and chocolate in a bowl in the microwave, at 30 second intervals. Bring the bowl out and mix after each blast, otherwise you might end up with a huge mess in there. Have you ever seen butter explode in the microwave? Scary.
3. In a large bowl stir the sugar, eggs and vanilla with a wooden spoon. Be enthusiastic about it, until well incorporated. No, you don’t need the electric mixer for this.
4. After the chocolate mixture has cooled slightly add it to the other ingredients in the bowl, by pouring in a steady stream while stirring continuously.
5. When that is fully incorporated and the mixture looks glossy, stir in the flour and salt. Mix until you can’t see any flour.
6. Pour half the batter into the tin and bake for about 15-20 minutes, or until it starts pulling away from the sides and firms up on top. It will become a little lighter in colour as well.
7. Bring the tin out of the oven and cool for another 15 minutes or so.
8. While that is cooling, melt the caramel sweets, milk and 1/4 tsp salt in a microwave proof bowl. Again, do it in 30 second intervals because you’re always better safe than sorry. I think caramel might also have explosive properties. Mix well between blasts and keep going till it’s nice and smooth.
9. Pour the caramel over the cooled brownie layer, trying not to get right to the sides so it doesn’t run down the sides. However, it’s not the end of the world if it does.
10. Stick the remaining brownie batter in the microwave and blast for about 10 seconds, or enough so that the mixture becomes more spreadable again (it will have firmed up while waiting). Blob it around over the caramel layer in the tin, and try as best you can to spread it evenly. Get to the edges so you sort of seal the caramel in.
11. Sprinkle a pinch of sea salt on top of the batter and bake for about 30 minutes, or until a toothpick comes out fairly clean. With brownies you never get completely clean toothpicks, but they shouldn’t be very gooey and chocolatey either.
12. Let brownies cool in the pan. I tried to remove them after 10 minutes and the top got all cracked. When completely cool, cut with cookie cutters and clean up the remaining bits by eating them quickly before anyone sees you.

Sharing the brownie love…
Twix Caramel Brownies by Two Peas and Their Pod (these are gooooood)
Bacon Brownies by Nigella Lawson (tried and tested – you don’t even know the bacon is there)
Salted Caramel Frosted Kahlua Brownies by Tracey’s Culinary Adventures
Roasted Cherry Brownies by Tracey’s Culinary Adventures
I could go on and on…
Oh, and guess what… looking through my bookmarked recipes to create this list, I found the recipe for which I bought the caramels!
Chocolate Chip Salted Caramel Cookie Bars by Two Peas and Their Pod

New Year Goodies – Beer Bread, Savoury Chocolate Biscuits and Ginger Snaps

06 Sunday Jan 2013

Posted by On Top Of Spaghetti in Cakes and Baked Goodies

≈ 13 Comments

Tags

beer bread, biscuits, brunch, cheese, cookies, ginger, savoury biscuits, snack

Beer bread, ginger snaps and chocolate biscuits with cheese on top, all on a pretty antique plate

The beautiful antique plate is Minton’s China Aster dating from 1861. Many thanks to The Collector for the kind loan.

Happy New Year everyone! It’s the first week of 2013 and I’m wondering what it has in store for us. The New Year finds me in the middle of a huge change, as I’ve packed in my “proper” job (you know, one that actually pays me a salary at the end of the month) to go off and work for a friend of mine who is starting his own company. Yes, a startup. A very popular word nowadays! There are people out there who surely think I’m nuts, especially since my job was with the British civil service. In these days of “The Crisis” the advice one tends to hear is “if you have a job stay put”. Well, I don’t really agree. Actually I think it’s kind of a miserable approach towards the one activity that takes up the largest chunk of our day – and our life for that matter. And we have enough misery around us, just by turning on the news. Of course not all situations are the same, and yes, I have the luxury of a support network, but I truly believe everyone should try their hardest to do something they are happy with. Don’t get me wrong, I spent 5 happy years working for an organization I have a lot of respect for, but the time was slowly arriving when I’d be ready for a change. So when the opportunity presented itself I grabbed it.

What will I be doing? Well, I’m going to keep you in suspense for a while. I have to work out what I can say here and when. Some elements have to be kept secret for a bit.  Gosh doesn’t that sound interesting?!

So for now I’ll stick to these gorgeous recipes. This is a platter of goodies I put together on New Year’s Day, most of which I spent lying in bed reading a good detective novel, drinking tea and snacking! I made these on New Year’s Eve, during a sudden urge to bake; they are perfect for midmorning snacking as they’re all somewhere between sweet and savoury and can be enjoyed as either. The chocolate biscuits are really interesting as you get the satisfaction of chocolate without too much sweetness and they can be paired fabulously with mature cheddar – just as Pigling Bland suggests in her Tales. It’s made me seriously rethink the amount of sugar I normally use in cookies; do I really need it? The ginger snaps are pure heaven smeared with a bit of butter – a discovery made by my mum the previous evening – but are also lovely dunked in tea. The strong ginger taste combined with the hot tea gives your mouth a sort of burning feeling but in a good way. Try taking a bite, chewing a bit, then washing it down with a gulp of hot tea. Aaahh. Can’t describe it.

Finally, the beer bread tipped the scales a bit further towards the savoury, creating a perfect balance. Again, butter makes it better. But what isn’t made better with butter? (I think I’ve got a bit of a slogan going there…). I remember seeing something on a blog, or maybe it was Twitter, about an apron that said on the front “Life is short, eat the damn butter”. I want that apron! The original recipe calls for pouring melted butter over the bread when it comes out of the oven. Surprisingly I haven’t tried that yet, but will do soon. This is my own version and it turned out great, but check my “Next Time” notes for my thoughts on improving it.

As I didn’t really make any changes to the first two recipes, I’ll just link back to the original sites. So we have:

  • Savoury Chocolate Biscuits (Cookies) by Tales of Pigling Bland. I didn’t have poppy seeds so I left them out, thus not using the egg wash either. They would have been prettier with the seeds.
  • Ginger Snaps by Alton Brown on the Food Network. I couldn’t be bothered to grate fresh ginger so left that out. The biscuits were gingery enough, but if you like them proper gingery then take the time do it. Or maybe add more dried ginger.
Top right: beer bread, bottom: ginger snaps, top left: savoury chocolate biscuits

Top right: beer bread, bottom: ginger snaps, top left: savoury chocolate biscuits

Beer Bread with Sundried Tomatoes and Amfilochia Cheese

Adapted from Beer Bread, 4 Ways by Bake at 350

Ingredients

3 cups self-raising flour
5 Tbs (60gr) chopped sundried tomatoes
3 Tbs sugar
1 ½ tsp dried oregano
330ml (about 12oz) Newcastle Brown Ale
1 cup Graviera Amfilochias (a strong Greek cheese, substitute with Parmesan or Pecorino or Grana Padano)

Instructions

  1. Preheat oven to 180C. Grease and line a loaf pan with grease proof paper (parchment).
  2. Put the flour in a large bowl. Spoon a little bit onto a plate and add the chopped sundried tomatoes. Mix them up so the tomato pieces are coated with the flour. Set aside.
  3. Mix the sugar and oregano into the flour in the bowl.
  4. Add the beer and stir.
  5. Mix in the cheese and sundried tomatoes, folding until you can’t see any flour. Don’t over mix.
  6. Spoon the mixture into the loaf pan (it will be thick, level as best you can) and bake for approx. 1 hour.

Next time:
I will use a lighter tasting beer. Newcastle Brown is quite strong, and although I like the taste it leaves, I have a feeling it’s overpowering the cheese. I will try it with a lager as well, just to see what happens. I will also use more sundried tomatoes, maybe 100gr.

Before I go, I want to say a huge thank you to everyone who has nominated me for blogger awards during the past few months. I have been really useless at reciprocating and I’m sorry for that. I will try to do something about it!

Upside Down Plum Cake – A Tasty Surprise

21 Sunday Oct 2012

Posted by On Top Of Spaghetti in Cakes and Baked Goodies, Dessert

≈ 4 Comments

Tags

baking, cake, plum, upside down

upside down plum cake on pretty white plate with antique silver spoonI had a natter about this recipe over on my Greek pages yesterday. The gist of the story is that after a friend of mine noshed through about a quarter of this cake in one sitting, I concluded it was a winner. The day I made it I had several very ripe plums in the fridge begging to be consumed a.s.a.p., but although I was in the mood for baking I didn’t have much time. So I scrolled down my (long) list of bookmarked favourites and saw this recipe from Real Simple. It was just right, not too many ingredients, not too much faffing around (well, a bit of faffing with chopping and in some cases peeling plums); it looked like a good option.

I used the sweet round plums rather that the Damson variety (the smaller, egg shaped ones), but any type would work I think. Some of them were really soft and a bit gooey, they were so overripe. Not at all deterred I just cut those in half, scooped out the soft flesh and threw some of the skins away in case they got too chewy. For this reason I used a few more plums than the recipe says, so I could completely cover the base of the pan. Also for this reason my pictures look nothing like the magazine’s!

The result was lovely. A beautifully light cake, with a tasty layer of tangy sweetness on top. You can easily eat through half this cake without feeling caked-out. Perfect to enjoy with a cup of tea or coffee. Try it!

side view of plum cake and spoon with light falling on to it

Antique silver Russian spoon from the early 20th century. With many thanks to The Collector.

Upside Down Plum Cake

Ingredients

1/2 cup (110g) + 1 Tbs butter (+ a bit more for greasing pan)
5-7 ripe but firm plums (it’s a good idea to have a couple extra on hand)
1/4 cup + 2/3 cup sugar
1 cup all-purpose flour
3/4 tsp baking powder
1/4 tsp baking soda
1/4 tsp salt
1 large egg
2/3 cup buttermilk
1 tsp vanilla extract

Instructions

  1. Preheat oven to 180C. Butter an 8 or 9 inch cake pan and line it with grease proof paper. If you’re using a springform pan cut the paper into a slightly larger circle so it goes up the sides a little. There will be juices and syrup at the bottom of the pan which might leak. Trust me.
  2. Stone the plums and cut each one into 8 wedges. If you have some mushy ones just pinch the skin (it should fall off) and put the gooey bits to one side.
  3. Melt the one tablespoon of butter in a frying pan over medium-high heat, add the plum pieces and 1/4 cup sugar, and cook till the sugar melts and the juices turn to syrup, stirring and tossing frequently. This should take about 3-4 minutes, maybe longer. Add the mushy bits towards the end, so they can soak up some of the sweetness from the syrup.
  4. Put the plum pieces into the cake pan, shaping them into concentric circles (a new word for me that – hey, I did know the Greek one). Pour the juice from the pan over the top.
  5. Combine the flour, baking powder, baking soda and salt in a small bowl. Use a whisk to mix them up (this is a great way to avoid sifting, which is a pain). Set aside.
  6. In a medium sized bowl, beat the 1/2 cup butter with the 2/3 cup sugar until light and fluffy, at least 3-5 minutes. Beat in the egg, buttermilk and vanilla. Add the flour mixture and keep beating (on low!) but only until it’s mixed in, don’t overbeat it. There shouldn’t be any floury bits.
  7. Pour the batter over the plums. Now, it may seem like there’s very little batter, or that it’s too thick. It certainly did to me. It’s at this point that I thought it was going to be a disaster. Luckily I didn’t chuck it all in the bin; I just gently spread the batter out with a spatula so that it reached the sides of the pan. Be careful you don’t disturb the plums underneath.
  8. Bake until a cake tester, aka toothpick, comes out clean, about 50-55 minutes. If it starts browning early, cover it with a piece of tin foil (mine did).
  9. Leave the cake to cool in the pan for about an hour. Cover the pan with a large plate and flip over so that the cake falls on the plate with the plum side up. Gently peel off the grease proof paper and admire your work!
  10. Quickly make a cuppa and sample a piece. Just so you know whether you’re going to share it.

Close up of the pretty purple colour on the top of the plum cake
Other interesting cakes with fruit (and one veg!)
Peach Cobbler Upside Down Cake, by Apron Strings Blog
Crackly Banana Bread, by Smitten Kitchen
The Perfect Apple Cake, a Community Pick on Food52
Pineapple Upside-Down Cake, by Susan Branch
Sweet Zucchini Bread, by On Top Of Spaghetti (that’s me!)

Macadamia, Olive Oil & Honey Granola – Clumpy, Crunchy, Crave-Worthy!

01 Monday Oct 2012

Posted by On Top Of Spaghetti in Breakfast, Cakes and Baked Goodies

≈ 18 Comments

Tags

breakfast, granola, honey, macadamia nuts, oats, olive oil

Clumpy granola with macadamia nuts pictured in a jar on a chopping boardI am a breakfast person. It’s my favourite meal of the day. Maybe it’s because breakfast is the fuel that gets us through the next 15 hours or so. Maybe it’s because breakfast calories “don’t really count” towards our daily intake as we can burn them all off (yes, I will continue to tell myself that, thank you). Or maybe it’s because we can get away with eating anything in the morning! Sweet, savoury, fresh, fried, baked, slow cooked; fruit, veg, sausages, bacon, cookies, porridge, spinach pie, apple pie, cake… literally anything! I draw the line at drinking Coke in the morning, but I know many people do.

Oats are considered one of the best options for breakfast, due to the slow releasing energy they provide, which keeps us going for much longer and helps us avoid snacking. That sounds really cool, slow releasing energy… Makes me feel a bit super-womany! Recently I’ve realized that it’s actually true. Oats and protein rich foods are best in the morning. Carbs are worst. This is my personal opinion and I have no idea if it is backed up by science! My philosophy is that our bodies speak to us and tell us what they need, what they want, what’s wrong. Ok, not always, or we’re not always in a position to understand the language it uses, but if we try I think usually we can get a good idea of what’s best. After being on the Dukan Diet for a couple of months, I came to realize that protein rich breakfasts are what’s best for me. If I have bread, or a pasty (popular in Greece), or fruit or cereal, I’ll be hungry by 10 and will probably get the shakes and a drop in blood pressure (especially if I have coffee as well). Eggs, ham, yogurt, cheese, all keep my energy going for longer, and my mind free of food related thoughts – at least until lunchtime! Oats also do that. I think they are high in carbohydrates so I’m a bit confused as to why, but they are definitely different to any boxed cereals I’ve ever tried.

During winter I love me my porridge. My Grandma used to say if you eat porridge when it’s hot you get itchy (again, no idea what science has to say about that!) so I don’t usually eat it in the summer. Itchiness aside, a hot breakfast in 40 degrees Celsius is not very appealing. A few years ago, I discovered another fabulous way to enjoy oats. Granola! The reason granola came into my life so late is that you can’t get it here in Greece, at least not easily. You definitely couldn’t get it until very recently. So I made my own! And since then I think the only recipe I’ve made twice is this Coconut Cranberry Granola. There are so many variations, so many ways to experiment, so many tasty ingredients to use, I always want to try something different.

Today’s recipe is based on the Coconut Granola by Two Peas & Their Pod. I’ve changed quite a few ingredients but the base is the same, with the same dry to wet ingredient ratio. And it works perfectly. I’ve read many granola recipes and a lot of them mention clumpiness as being a desired but hard to accomplish result. Well, I think the combination of honey with olive oil is great for this. My granola was super clumpy, which is exactly how I love it. It tastes brilliant and it keeps fantastically well in an air tight container or jar. Try it!

Macadamia, Olive Oil & Honey Granola

(adapted from Two Peas & Their Pod Coconut Granola)

Ingredients

2 cups rolled oats
1/2 cup macadamia nuts, roughly chopped
1/2 cup desiccated (shredded) coconut
1/4 cup flax seeds
1/3 cup sunflower seeds
2 Tbs brown sugar
1 tsp cinnamon
1/2 tsp salt
1/2 cup honey
1/4 cup olive oil
1 Tbs vanilla extract (that was supposed to be 1 tsp but I messed it up. It turned out great anyway! If you’re using the expensive store bought type stick to a teaspoon. Or sub with coconut extract)

Instructions

  1. Preheat your oven to 150C and line a baking sheet with grease proof paper.
  2. Mix all the dry ingredients (oats through to salt on ingredient list) in a large bowl and set aside.
  3. Combine the honey and olive oil in a small saucepan and heat gently till the honey has completely melted. Whisk till incorporated.
  4. Add the vanilla extract to the wet ingredients and stir.
  5. Add the wet ingredients to the bowl with the oats and stir well with a wooden spoon till the dry ingredients are well coated with the honey mixture.
  6. Turn mixture out on to the baking sheet and spread it out so it’s in a single layer. Try to press it down firmly (a rubber spatula is good for that) as this helps make it clumpy.
  7. Bake for about 30 minutes or until granola is golden. Don’t let it brown as it will turn bitter.
  8. Enjoy with Greek yogurt, milk or –my favourite- buttermilk. It’s also great as a topping over porridge (oatmeal).

More granola goodness:

Morning Time Breakfast Granola Cups by Mommie Cooks
Cookbook: The Homemade Pantry and The Nutty Granola Bar by Food In Jars
Low Fat Granola Bars with Mango, Hazelnut & Ginger Recipe by Cookin’ Canuck
Small Batch Honey-Pistachio Granola by Mountain Mama Cooks

← Older posts

Click to follow me and get all my new posts delivered to your inbox!

The Foodie Corner logo

Search Other Food Blogs

Proud member of FoodBlogs
noimage
FBC5 Alumni Badge
Foodista Food Blog of the Day Badge

Categories

  • Breakfast (8)
  • Cakes and Baked Goodies (13)
  • Dessert (18)
  • Dips, Spreads, Chutneys (6)
  • Dukan Diet Friendly (16)
  • Fish & Seafood (5)
  • Meat (18)
    • Beef (9)
    • Chicken (4)
    • Pork (5)
    • Turkey (4)
  • Meatless (18)
  • Pasta (5)
  • Pies, Quiches, Frittatas (5)
  • Slow Cooker (17)
  • Soup (4)
  • Uncategorized (1)

Most Viewed

  • Beetroot Brownies for Jamie's Food Revolution Day Picnic
  • Easy Bougatsa (Greek Custard Pie)
  • Apple Frozen Yogurt – A Sweet Moment on a Bitter Day
  • Mini Dukan Lemon Cheesecakes and a Sneak Preview of The Foodie Corner

Favourite Food Blogs

  • A Year of Slow Cooking
  • Brown Eyed Baker
  • Food In Jars
  • In Jennie's Kitchen
  • Kalyn's Kitchen
  • Slow Cooker From Scratch
  • The Kitchn
  • The Perfect Pantry
  • The Stone Soup
  • Two Peas and Their Pod

Horses. My other passion

  • Haynet – Equine Social Blogging Network
  • Ride With No Eyes
  • School Your Horse

Archives

  • June 2014
  • May 2014
  • March 2014
  • January 2014
  • December 2013
  • November 2013
  • October 2013
  • September 2013
  • August 2013
  • July 2013
  • June 2013
  • May 2013
  • April 2013
  • March 2013
  • February 2013
  • January 2013
  • December 2012
  • November 2012
  • October 2012
  • September 2012
  • August 2012
  • July 2012
  • June 2012
  • May 2012
  • April 2012
  • March 2012
  • February 2012

RSS Links

  • RSS - Posts
  • RSS - Comments

Now on Facebook!

Now on Facebook!

Meta

  • Register
  • Log in
  • Entries feed
  • Comments feed
  • WordPress.com

Create a free website or blog at WordPress.com.

Privacy & Cookies: This site uses cookies. By continuing to use this website, you agree to their use.
To find out more, including how to control cookies, see here: Cookie Policy
  • Follow Following
    • On Top Of Spaghetti
    • Join 141 other followers
    • Already have a WordPress.com account? Log in now.
    • On Top Of Spaghetti
    • Customize
    • Follow Following
    • Sign up
    • Log in
    • Report this content
    • View site in Reader
    • Manage subscriptions
    • Collapse this bar
 

Loading Comments...