• About Me
  • About the Name
  • Recipe Index
  • On Top Of Spaghetti… στα Ελληνικα!

On Top Of Spaghetti

~ …All covered in cheese!

On Top Of Spaghetti

Category Archives: Beef

Slow Cooker Sausage and Black Eyed Bean Soup with Beet Greens

23 Thursday Jan 2014

Posted by On Top Of Spaghetti in Beef, Meat, Slow Cooker, Soup

≈ 8 Comments

Slow Cooker Sausage and Black Eyed Bean Soup with Beet Greens by On Top Of Spaghetti https://ontopofspag.wordpress.com
Happy New Year! What, it’s still January isn’t it? Here in Greece we say Happy New Year till February! I hope 2014 turns out to be the year we’ve all been waiting for.

I posted this recipe on The Foodie Corner a while ago, and it was the first recipe of the new year there too. I thought it was appropriate as it sort of represents a few of my goals for my Greek blog. Plus it’s got black eyed beans and greens in it, which are reminiscent of Hoppin’ John – a good luck dish eaten in the States. What better for a New Year’s recipe?

In case you’re wondering what those goals are and how they can be represented by a soup, I’ll explain. This soup is:
1. Healthy. I want to post more healthy recipes (you know, in amongst the chocolate cakes and baked brie).
2. Tasty but also frugal. Planning my food shopping, economising and avoiding waste; all happening in 2014.
3. The recipe is my own. I opened the fridge and let my imagination get a work out (I literally just put whatever I found, in the soup). I like that and want to do more of it.
4. It’s a slow cooker recipe. My slow cookers are going to be getting even more use this year.
5. Did I mention the black eyed beans and greens? Green as in the color of dollars? Yeah. Another goal. Preferably in euro but I won’t be picky.

So here’s my lucky soup recipe. It’s one of the good ones, you know, plop it all in the slow cooker and do something else for the rest of the day! Enjoy!

Slow Cooker Sausage and Black Eyed Bean Soup with Beet Greens

Ingredients

1 c. dried black eyed beans (no need to pre-soak… yay)
1 c. liquid from draining pumpkin puree (I told you, imagination! Obviously you can substitute with water)
3 c. hot water
200 gr. beef sausage, without casings, sliced
1 large handful of beet greens (I used the smaller ones with a thinner stalk, but you can use any of them, they cook for long enough to soften)
1 ½ celery stalk, sliced
½ yellow pepper, chopped
1 medium carrot, grated (I grated it to hide it from The Mister, you can just slice it)
1 ½ Tbs tomato paste (the thick puree that comes in a tube or small can)
1 tsp mixed dried herbs
½ tsp black pepper, freshly ground
½ tsp sweet paprika
1 parmesan rind
1 tsp coarse salt
extra grated parmesan for serving (optional)

Instructions

1. Add all the ingredients apart from the last three (parmesan rind, salt and extra parmesan) to the slow cooker. Turn on low and cook for at least 10 hours, or till the soup is thickened and the beans are soft.
2. Midway add the parmesan rind. (I forgot and added it for the last hour. This was not enough. If you’re going to be away add it in the beginning).
3. Towards the end of cooking, taste the soup and add salt if needed. The sausage may be salty enough (it wasn’t for me). Also they say that salt doesn’t help dry beans to cook, so I thought it would be best added after they have softened.
4. If you want you can use an immersion blender to thicken the soup more. Just pulse once or twice. Or transfer one cup of soup to a blender, pulse, and return to the slow cooker and stir in.
5. Serve with grated parmesan. Feta might be a nice alternative too.

Pastitsio. Need I Say More?

07 Thursday Nov 2013

Posted by On Top Of Spaghetti in Beef, Meat, Pasta

≈ 19 Comments

Tags

bechamel, bolognese, cheese, crockpot, Greek, meat sauce, minced meat, pasta bake, pastitsio, slow cooker, spaghetti

A piece of pastitsio with a glass of red wineHello! Well, yes, here I am! It’s been a while. Phew, a busy few weeks. I’ve just completed the last of a series of projects that popped up at the same time as my new Greek blog launch. One was a recipe contest for the restaurant chain TGI Friday’s, the other a guest post at a food related website (more on that in future) and the final one was another secret mission about which I can say that it involved making a Christmas recipe and photographing it. While it was 25C outside. Weirdest feeling!

All this at the time I was supposed to be building up the content of my own new blog. And practicing my new food styling and photography skills after a fabulous workshop in Holland at the end of September. Oh, and entertaining my gorgeous little nephews who came over for a week’s visit from the UK with my cousin and my uncle! Rather than try and do everything at once (I’m not good at that) I set myself a schedule (I’m better at that) and got all the projects done one after the other, while keeping a week in between completely free so I could enjoy the holiday with my family. It was my uncle’s first visit to Greece, after his sister (my mum) has lived here for 45 years! It was such a fab week!

pics from the family holiday

Gazing at the sea on a one-day cruise
Swimming in a pool all to oneself
Being buried in the sand
Eating a huge ice-cream
Digging one’s way to China

Now I’m hoping to get into a rhythm with my posts, both for The Foodie Corner and OTO Spaghetti, and maybe show up here a little more often. That’s the plan anyway…

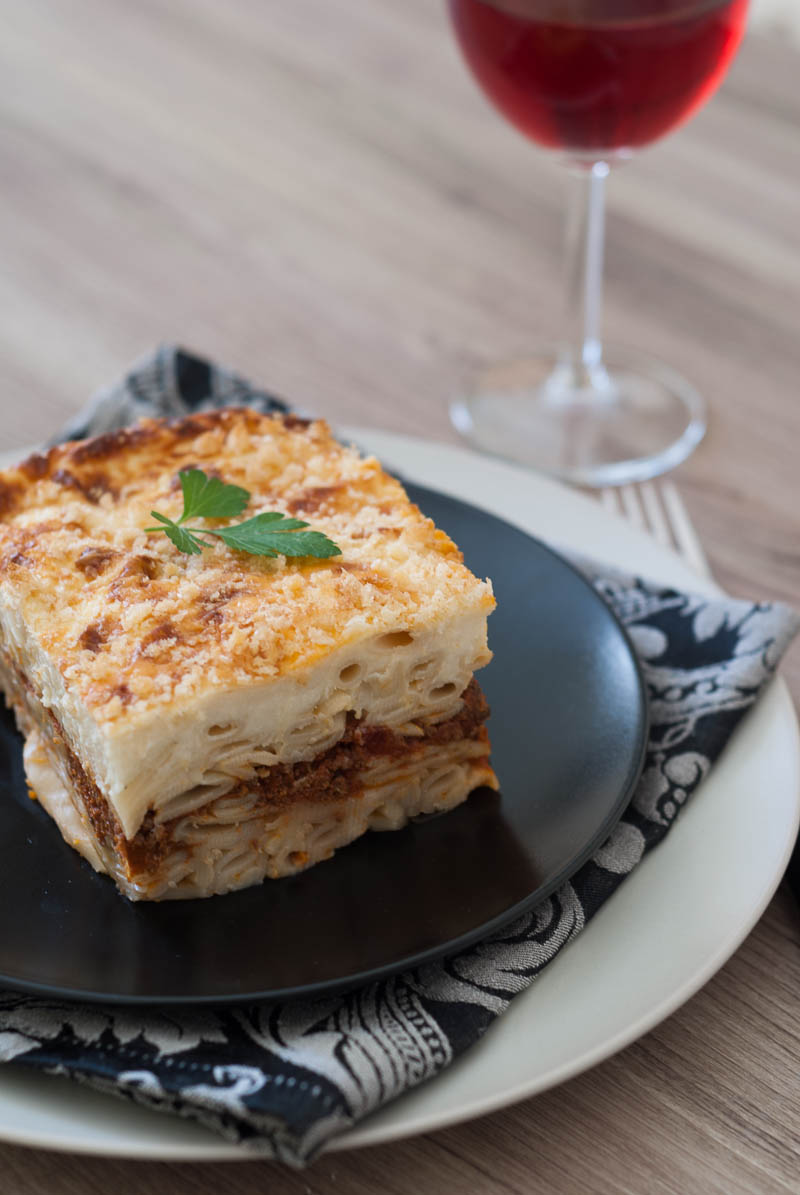
In order to celebrate all the above, and to make up for my disappearance, I am sharing a really good recipe. Not that all the rest aren’t really good… but this is a rather special dish. Pastitsio. Anyone who has been to Greece knows what it is. Its elements are I suppose –more or less- the same as those of lasagne, but somehow the taste is different. Equally yummy, but different. While lasagne is best made to be fairly sloppy, pastitsio should be able to proudly stand tall with each layer clearly visible on its mouthwateringly beautiful profile. Yes, I do love my pastitsio, is it that obvious?

Now, I know with lasagne lots of people go and add a cartful of veggies and make all sorts of adjustments. That would be fine here as well, but your end result would not be pastitsio. I’m sure it would be tasty, but I would have to object to the name being used in vain. The meat sauce has to be fairly simple, in fact even my recipe is quite a fancy version, and it has to be thick, not runny. It might be hard to find the proper pasta to use, it’s called bucatini (a thick spaghetti with a hole running through it), but it’s worth the search. If you really really really have to, use penne or rigatoni. I don’t think spaghetti is a good substitute. The béchamel, unlike lasagne, has egg in it which keeps it nice and thick (remember the standing tall thing).

Pastitsio is one of those with which you end up dirtying a hundred different pots and pans. That might have something to do with why I don’t make it that often… But it’s soo worth it. Here’s the recipe. It’s based on the one in the little Greek book “Recipes for children” by Mima Karvouni, a little gem of a book I use to find things to make for The Mister when I run out of ideas for food he might actually like rather than put up with (i.e. my usual blog experiment type cooking). For the meat sauce I use my slow cooker Bolognese recipe which is super tasty. Making it in the slow cooker is brilliant in this case, as you will see from all the steps below. You can make it the conventional way, there is a note in the same post for a stovetop method.
Pastitsio side view
So, here goes… (ingredients are listed by order of appearance)

Pastitsio

Ingredients

500g bucatini pasta
2 Tbs margarine or butter or 1 Tbs oil (to keep the pasta from sticking)
1/2 c grated cheese (a hard yellow cheese would be best, like gruyere or parmesan or maybe manchego)
1 egg
salt & pepper
1 litre (approx. 4 cups) thick Bolognese sauce. Use this recipe BUT omit the stock to ensure a thicker consistency. It should be slightly thicker than what you would want from a sauce over a plate of pasta.

For the béchamel
100g margarine or butter
100g all purpose flour
1 litre milk
pinch of nutmeg
salt & white pepper (or black if not available)
1 egg

3/4 c grated cheese for topping
1/4 c breadcrumbs (not traditional, can be omitted)

Instructions

1. Boil pasta according to packet instructions, being careful not to overcook. Drain and add the 2 tablespoons of marge. Stir gently so that pasta is coated, then set aside to cool.
2. If you haven’t already made your meat sauce, do that now.
3. When the pasta has cooled a bit, add the egg and ½ cup of cheese, stirring gently till the pasta is coated with the mixture. Careful the egg doesn’t scramble.
4. Put half the pasta in a baking dish (mine is 30cm x 27cm – about 12”x10.5”), spread it around nicely and add the meat sauce in a layer on top. Then cover the meat sauce with the rest of the pasta, again spreading it out.
5. Make your béchamel. It’s important here that you have all the ingredients ready next to you. Melt the marge in a medium sized saucepan on medium to high heat, add the flour and mix well with a wooden spoon. You want the mixture to come together into a paste. Cook for a few minutes stirring constantly. Working quickly, switch the spoon for a whisk* (keep spoon next to you), lower heat to medium and add about half the milk while whisking quickly. Keep whisking till the mixture becomes smooth. It might thicken quickly, if it does then add the rest of the milk, without stopping the whisking. If it doesn’t, add the rest of the milk gradually (still whisking). When you are confident that the sauce is smooth, turn the heat up just a bit and switch back to your spoon. I find the spoon better at this stage as I can feel the bottom of the pan better and know if it’s catching. If it is, turn the heat back down to medium. Keep stirring, getting into the corners of the pan, till the sauce thickens a bit. It doesn’t need to be super thick as the egg will thicken it later. I stop when I can just see the bottom of the pan when the spoon swishes around during stirring.
6. Take the béchamel off the heat, add the nutmeg and some salt and pepper.
7. Preheat the oven to 200C (or 180C on fan).
8. When the béchamel has cooled just a bit, add the egg while stirring vigorously. Pour the sauce over the top layer of pasta in the dish.
9. Mix the ¾ cup cheese with the breadcrumbs and sprinkle over the top of the pastitsio.
10. Bake for about 45 to 50 minutes, until the top is nicely browned. Let the pastitsio rest before cutting and serving.

Note: (*) I find the best whisk for sauces and custards is the one pictured below. It gets into the corners of the pan better than the others, which are more suitable for bowls.
whisk

And a small announcement: In between writing steps 9 and 10 I found out that two of my recipes have made it to the final of the TGI Friday’s recipe competition. I’m a happy bunny!

Dukan Moussaka – Fabulously Healthy Protein and Vegetable Dish

22 Monday Apr 2013

Posted by On Top Of Spaghetti in Beef, Dukan Diet Friendly, Meat, Slow Cooker

≈ 4 Comments

Tags

aubergine, beef, cauliflower, crockpot, Dukan diet friendly, eggplant, Greek, low fat, meat sauce, protein, red pepper, slow cooker, vegetables

A piece of moussaka on a pretty blue plateThis is a complicated recipe. It’s not at all difficult, but there are many steps to it. It’s not a throw-together-right-after-work meal, but you can make it in stages over a couple of days; and that makes life a lot easier. The seed for this idea was planted when I made the Healthier Mac & Cheese using a cauliflower béchamel. I started wondering if I could use this sauce in a lasagna, but then it occurred to me that it’s actually Dukan friendly. So my thoughts turned towards adapting a classic dish to suit this protein and veg based diet. Lasagna was out due to the pasta, so what else could I make? Moussaka of course! Sadly the potato had to be replaced, but layers of red peppers compensated by lending their sweetness and bright colour to the dish.

On my first go at this experiment I tried to dry fry slices of aubergine (no oil is allowed in the diet) so as to keep with the traditional layering of meat and veg. That didn’t really go too well; aubergines like their olive oil. Also, I made the cauliflower sauce based on the mac & cheese recipe, which turned out a bit too watery and meant the top layer was very thin. So the second time round, I cooked the aubergine (eggplant) together with the meat in order to overcome the dryness issue, and made a thicker cauli sauce without the addition of water. There were less layers than traditional moussaka, but everything held together much better, and the result was tastier and much prettier!
view from the top of the moussaka's creamy cauliflower topping
I used the slow cooker to make the meat part, since this is by far the best method for cooking without oil or any other kind of fat. It’s also a great way to make minced meat sauces in general, as they always benefit from long simmering on low heat. I always leave my Bolognese on for a good 10 hours. If you don’t have a slow cooker I’m sure it would work just fine on the stovetop. Use water to gently cook the onion, then add the meat, and don’t forget to drain the fat before adding the rest of the ingredients. You want the result to be quite thick so watch the amount of liquid you add.

Before it’s cooked , the aubergine needs a bit of alone time with a good sprinkling of salt (don’t worry, it’s rinsed off!). This helps get rid of the bitterness that sometimes comes with this vegetable. I recently heard an interesting tip for those who grow their own aubergines; apparently if you plant them next to basil they’ll be less bitter to begin with!

As regards the preparation of this dish, what I did was make the meat sauce the first day. Then in the evening I made the cauliflower puree. Both went in the fridge overnight. The next day I made the peppers, mixed the puree with the rest of the topping ingredients, layered it all up in the baking dish and baked it. Broken up like that it’s not that big a deal really. And it’s well worth it! Oh, you could also use store bought roasted red peppers, but since they are usually preserved in oil it would be cheating a bit.

If you are not on the Dukan Diet, this is still a recommended recipe. It’s super healthy, low in fat, and very tasty. I suggest you sprinkle some grated cheese on top before baking! (Also allowed in the Consolidation phase of the diet)
My Dukan Moussaka in the baking dish, straight from the oven!

Dukan Moussaka – Fabulously Healthy Protein and Vegetable Dish

Step 1

Slow Cooker Meat Sauce with Aubergines (Eggplant)

Ingredients

1 medium onion, chopped
3 Tbs water
500g minced lean beef
2 Tbs water
2 Tbs white wine vinegar
400g chopped tomatoes with juice + 2 Tbs water to rinse tin
1/2 cup tomato passata
2 medium aubergines, cut into chunks
1/2 tsp cinnamon
1/4 tsp freshly cracked pepper
1 bay leaf
Salt

Instructions

  1. Prepare aubergines by putting the chunks into a colander and sprinkling with salt. Give them a shake and sprinkle again, so that all the pieces have salt on them. Leave for 20-30 minutes (on a plate, as the veg will release a bit of water).
  2. Sautee the onion in the 3 tablespoons of water on medium low heat till softened. Add to the slow cooker. Or just put the raw onion in the slow cooker and save yourself a step – to be honest I doubt it makes much difference to the end result.
  3. Put the pan back on the heat, turn it up to high, and add the 2 tablespoons of water followed by the minced meat. Stir continuously breaking up any clumps. The meat will release fat and juices and start bubbling. When it’s brown all over with no pink showing, add the vinegar. Stir well and let it all bubble till the liquid in the pan has reduced. Transfer meat to the slow cooker with a slotted spoon and discard the remaining fatty juices (this is a diet dish!).
  4. Add the tomatoes, passata, cinnamon, bay leaf and pepper to the slow cooker. Stir well.
  5. Rinse and strain the aubergine well. Add to the slow cooker and stir into the mixture.
  6. Cook on low for 10 hours (I imagine it would be fine after 8, but I was out so I don’t know for sure!). If you are around give it a stir halfway through.

Step 2

Red Pepper Layer

Ingredients

2 red peppers (I used the long Greek ones, but bell peppers would be fine)

Instructions

  1. Cut one side of a pepper from the stalk down to the bottom, then do the same on the opposite side. You want to end up with two big pieces, as wide and flat as possible. These will make up the layer that separates the meat from the topping. Don’t worry about the bottom or sides curling in, they will flatten a bit after they are softened. If necessary, measure the pepper pieces against the baking pan or dish that you will use. If needed, use another pepper.
  2. Take a large frying pan with a lid, cover the bottom of the pan with water, lay the pepper pieces in it and turn the heat to medium. Cook covered till the peppers are well softened, turning once. Mine took about 30 minutes. My mum suggested that I try doing this in the microwave next time. I wish she’d said it earlier… Anyway, make sure they don’t catch on the bottom of the pan. If necessary turn the heat down a bit or add more water. Set aside.

Step 3

Cauliflower and Yogurt Topping – The Fake Béchamel

Ingredients

1 smallish head of cauliflower (I forgot to weigh it – I think it was probably about 600-700g). You want it to produce 2 cups of puree.
1 Tbs vinegar
1 tub (200g) Greek yogurt (2% fat)
2 eggs
1/4 tsp white pepper
1/4 tsp nutmeg
1/2 tsp salt

Instructions

  1. Cut the cauliflower into florets and put in a pan with a fitted strainer. Add water to the bottom of the pan (don’t let it touch the bottom of the strainer), together with the vinegar. Cover with a tight fitting lid and steam the cauliflower till very soft. (Vinegar helps with the smell!)
  2. Remove the cooked cauliflower and blend it well, till it’s very smooth. Let cool a little. You want two cups. If you have some leftover, use it as a healthy sauce for meat or fish (you can thin it out with milk if necessary).
  3. Add the yogurt to the cooled cauliflower puree while stirring continuously, followed by the eggs, pepper, nutmeg and salt. Make sure it’s all well incorporated.

Step 4

The Dukan Moussaka – General Assembly!

Instructions

  1. Preheat the oven to 200C. In a baking tin or dish, evenly spread the meat and aubergine sauce.
  2. Lay the peppers on top, creating a layer and trying to cover the meat as well as possible.
  3. Spoon the cauliflower mixture on top of the peppers and level it out. The dish I used is 16x25cm and everything fit perfectly.
  4. Bake in the hot oven for 50-60 minutes, till it’s bubbling at the sides and firm on top. It will probably start to brown on the top, but mostly around the sides. I couldn’t get mine to brown all over. It didn’t matter!

Other Moussaka recipes – but none of them Dukan!
Moussaka by Brown Eyed Baker
Vegetable Moussaka by The Shiksa in the Kitchen
Leek Moussaka by The Perfect Pantry
And something a little different… Mussaka by FatFree Vegan Kitchen

Slow Cooker Giouvarlakia – Meatballs in Egg-lemon Sauce or Soup

12 Tuesday Mar 2013

Posted by On Top Of Spaghetti in Beef, Meat, Pork, Slow Cooker, Soup

≈ 14 Comments

Tags

avgolemono, crockpot, egg lemon sauce, Giouvarlakia, Greek, lemon, meatballs, minced meat, potatoes, slow cooker, soup, vegetables

A purple plate with meatballs in a creamy egg lemon sauceFor a while now I’ve been meaning to try and adapt this classic Greek recipe for preparation in the slow cooker. It’s one of those things I usually remember at the wrong time, like when I haven’t defrosted the minced meat. Finally, on Saturday I remembered to take the meat out of the freezer, buy parsley, and properly plan my experiment for Sunday. This had to be a weekend endeavour for me, as I knew the meatballs wouldn’t need all day in the slow cooker, and my working hours have me away from home for at least 9.5 hours on weekdays.

Giouvarlakia are meatballs made with rice in the mixture, cooked in water or stock and served (traditionally) in egg-lemon soup (Avgolemono). If you don’t fancy soup, this version makes the juice just thick enough to act as a sauce (albeit a runny one), ideal for being mopped up with fresh crusty bread. Chips (French fries) are also good vessels to use for plate cleaning in this case. The resulting meatballs are similar to the insides of these stuffed courgettes, but are much easier to make.

I started by prepping the veg, cutting it into fairly small pieces to cook quicker, and getting it going in the Crockpot. I then made my Giouvarlakia, slightly on the large side so as to delay cooking time a bit and allow enough time for the potatoes and carrots to soften. They were bigger than golf ball size, with about 3-4 level tablespoons of mixture in each one. The amounts stated below gave me nine meatballs. I used a 4 quart Crockpot and the meat, perched on top of the veg, was partially submerged in the 3 cups of water.

Slow Cooker Giouvarlakia

Serves 3

Ingredients

1 medium sized potato, cut into smallish pieces (approx. 3-5 cm or 1-2 inches)
2 small carrots, sliced
1 celery stick cut into chunks
3 cups of water or stock
500g minced meat (I used a mix of beef and pork, you can use just beef if preferred)
1 small onion, chopped finely
2 Tbs parsley, chopped finely
5 Tbs rice for risotto (Arborio or similar)
2 tsp salt, divided
¼ tsp pepper (I used white)
1 tsp olive oil
2 eggs
1 large lemon, juice

Instructions

1. Place potatoes, carrots and celery in the bottom of the slow cooker insert and pour in the water. If you want to help things along and maybe shorten cooking time, you can use boiling water. I used 2 cups cold, 1 cup boiling. Sprinkle one teaspoon of salt over veg and water. Turn on slow cooker to low.
2. In a large mixing bowl, combine the meat, onion, parsley, rice, 1 teaspoon salt, pepper and oil. Mix well with your hands till it comes together, but don’t over mix so the meatballs aren’t too dense.
3. Shape the mixture into meatballs and place on top of the veg in the slow cooker. Some won’t be completely submerged, that’s fine.
4. Leave them to cook for about 6 hours and check for doneness. You can use a thermometer or break one in two and take a peek. I find that the thermometer is best, as sometimes meat in the slow cooker keeps a sort of pinky colour, even if it’s well over the required temperature. Mine were in for 6 ½ hours on low and were done, as was the veg. During cooking (after about 3 hours) I also turned them upside down once, using barbeque tongs, but I’m sure they would have been fine even if I hadn’t disturbed them at all.
5. When the meatballs are ready take them out of the slow cooker with a slotted spoon (keep them warm as best you can, but don’t worry too much). In a mixing bowl beat the eggs and lemon juice till well combined. Place the bowl next to the slow cooker, and using a ladle, slowly add small amounts of hot juice into the egg mixture, beating continuously. Start with about one tablespoon at a time, and gradually increase the amount of juice added to the bowl. This is called tempering the eggs and it needs to be done so they don’t scramble. When most of the juice from the Crockpot has been transferred to the egg mixture, and the bowl feels warm to the touch, pour the mixture back into the insert. Take the insert out of the base and move it round a bit, so the sauce goes all round the veg, and place it back into the slow cooker.
6. Put the meatballs back into the sauce (or soup!), cover and leave for about 5 minutes till it’s all warmed through again. Keep an eye on it so the egg doesn’t misbehave!
7. Serve with fresh crusty bread and feta cheese.

Note: If you want to enjoy this as a soup, I suggest you use 4 cups of stock instead of the 3 cups of water.

Slow Cooker Meatball Mania!
Slow Cooker Meatballs with Orange Marmalade, by The Chic Life
Slow Cooker Asian Meatballs, by Taste and Tell
Apple, Turkey and Cheddar Meatballs Crockpot Recipe, by A Year of Slow Cooking
Almost Dukan Friendly Slow Cooker Turkey Meatballs, by On Top of Spaghetti

Light Slow Cooker Meatloaf and My Dukan Progress

11 Wednesday Jul 2012

Posted by On Top Of Spaghetti in Beef, Dukan Diet Friendly, Meat, Slow Cooker

≈ Leave a comment

Tags

crockpot, dukan, ground beef, meatloaf, minced beef, oat bran, slow cooker

I’m really happy today. I’m only 600 grams away from the target weight I set for myself only 2.5 weeks ago, which means I’ve lost 3 kilos (about 6 pounds)! That’s pretty amazing if you ask me. It hasn’t been particularly hard, apart from the one day I wanted sushi and could only have sashimi, and the evening The Mister and I went out for dinner and his plate of chips (French fries) was sitting under my nose while I was eating plain grilled chicken. Hopefully the next phase which for me will last just over a month, will be as easy. I think that’s where most people give in to temptation!

Last week I was feeling adventurous, and fancied something different for dinner. The Dukan book has a recipe for meatloaf in it, so that gave me the idea to try my own version of this classic dish. The book version seemed ok, but I wanted to add my required daily dose of oat bran to the mix, since meatloaf normally includes bread. I also wanted to make it in the slow cooker, as my oven is currently on holiday. Temperatures here these days are crazy high, or at least the feels-like factor is, so the heat from the slow cooker is about as much as I can handle. I looked up a few recipes, and in the end decided to follow this one from the Betty Crocker site as a guide but with a couple of changes.

The result made me very happy indeed! I really love it when I experiment and get good results, it makes me feel very creative. The meatloaf was just right, but because this is a light (diet) version it’s not overly moist. In terms of the Dukan Diet, this can be eaten in all phases. Just make sure you calculate how much extra oat bran you need to eat on that day, so you reach the required 1 ½ or 2 Tbs. This recipe uses 2 Tbs for the whole thing, so if you eat half of it, you’ll want another ½ or 1 Tbs depending on which phase you are on.

Before moving on to the recipe, I have to also mention the fab idea I got from Stephanie O’Dea’s website, in the comment section. A reader sent her an email suggesting she uses an upside-down aluminium pan with holes punched in, to put the meatloaf on inside the slow cooker so the fat drains away from the meat. I used throw away aluminium muffin cups, placed upside down! Even better than a pan, because they fit in the insert easier. I made some holes, but I think next time I won’t bother, as most of the fat will drain away down the sides of the cups.

I should also mention that The Mister ate this happily, with mashed potatoes (*sigh*) and gravy (which I made from granules – it can’t all be from scratch!). So it’s definitely good enough for non-dieters!

So, here is my
Light Slow Cooker Meatloaf aka Dukan Slow Cooker Meatloaf
Serves 2 hungry people, or 3 less so

What you need:
500g minced/ground beef (as lean as possible)
1 small onion, minced or finely chopped
1 egg
¾ Tbs Worcestershire sauce
1 Tbs chopped parsley
1 tsp dried oregano
1 tsp salt
½ tsp black pepper
1/3 tsp mustard powder
2 Tbs oat bran soaked in 3 Tbs milk (0% for Dukan dieters) for a couple of minutes

What you do:

  1. In a large bowl mix beef, onion, egg, Worcestershire sauce, parsley, oregano, salt, pepper, mustard and oat bran (spooned out of milk). Knead with your hands until just incorporated. Don’t over knead because apparently this makes the meatloaf denser.
  2. Check how moist the mixture is. If it’s not too wet, add a tablespoon or 2 of the milk which had the oat bran in.
  3. Put a meatloaf insert or upside down aluminium muffin cups into the slow cooker.
  4. Shape the meat mixture into a loaf and place on top of the insert/muffin cups. You can pop it directly into the slow cooker but there will be fatty juices accumulating around it during cooking. If you’re on a diet I suggest you elevate the meat so it’s drier.
  5. Cook it on low for 6-8 hours. I cooked it for 1 hour on high then switched to low for another 5. The meat will brown a little but not too much; it won’t look like it does in the oven! Check doneness with a food thermometer, which should read at least 160F.
  6. Let it rest for about half an hour before slicing.

Note: Most recipes I came across have ketchup or BBQ sauce spread on top during cooking. This wouldn’t be Dukan friendly so I didn’t do it. If you try it I’d love to know how it works out!

Stuffed Courgettes (Zucchini) with Egg Lemon Sauce – My Slow Cooker Success

28 Monday May 2012

Posted by On Top Of Spaghetti in Beef, Meat, Pork, Slow Cooker

≈ 5 Comments

Tags

avgolemono, courgettes, crockpot, egg lemon sauce, Greek, slow cooker, vegetables, zucchini

A couple of weeks ago I decided to experiment with another slow cooker adaptation. I had prepared myself towards a possible flop because after all, I was trying something quite tricky. I started by looking for a traditional recipe for this dish as it wasn’t something I knew off by heart. I’d only ever made it once, the regular way, a few years ago. I found one I liked the look of, and kept the quantities to a minimum, just so that if it was going to be a disaster, I wouldn’t end up hyperventilating at the waste of good food! Well. I needn’t have worried! After the first taste test I was high fiving myself, punching the air and doing a little victory dance round the house. Yes, I was mighty proud of myself, and I still wear a bit of a smug expression when I look at the pictures!

So, Stuffed Courgettes (or Zucchini if you’re reading from the US) in an Egg Lemon Sauce. Delicious. Ok, I admit, anything in egg lemon sauce is delicious for me, but this dish really is good. Here in Greece, up until a few years ago, you could only get the long green courgettes. Recently though, you see these really cute variations that have the same colour and taste, only they look like they’ve swallowed a tennis ball! Seriously, I find their almost perfect round shape hilarious, I don’t know why. When I saw some in the supermarket I thought right, I am going to try these stuffed, in the slow cooker. Actually they are ideal for stuffing as they have so much flesh, thus lots of room for filling, once the flesh is removed.

Now I must warn you, this isn’t a throw-everything-into-the-slow-cooker-and-turn-on type of recipe. It takes some prepping. But it’s worth it, and you do avoid the whole palaver of trying to boil the stuffed zuckes with an upside-down plate lying on top of them (yes, I know, weird – I think it’s to stop them moving around).

I’m not big on taking photos of each step when trying a recipe, usually because it’s what’s for dinner and needs to be completed in a reasonable amount of time. Also, more often than not, I’ll forget to snap a step or two and then it’s all messed up anyway. This time however, I couldn’t resist a couple of extra photos during the preparation of the courgettes – they are just so pretty. And I thought it might help readers to visualise certain aspects of the process (i.e. gutting the zuckes). And they’re so pretty.
So, here they are. See I told you they were cute (ok, sorry, I’ll stop now). You start by slicing the tops off, to make little lids. Keep them aside. To get the insides out I suggest the following tools: a knife (smallish, you want good control) and –ideally- a melon scoop (at least I think that’s what that is). What a useful contraption. It came in a set of three, a citrus zester, an apple corer and this spoon-like thing that looks like a mini ice cream scoop with a hole the middle. I gather it’s for making little balls of melon or watermelon. It’s great for scooping out the courgette flesh because it’s sharpish around the edge and you can position it at a good angle inside. So, you start scooping leaving a wall around the bottom and sides of the veg. You want them to be sturdy enough to hold, but you also want room for a decent amount of filling. I left just under one centimeter of flesh. It’s a good idea to lift the courgettes and hold them in your hands while scooping; this way you can sort of feel how close you’re getting to the sides. If you’re using regular, long zucchini you might find an apple corer useful, at least in the beginning. After you get the first chunks out continue with a small spoon.

Remember you need to keep the flesh. Some of it goes in the recipe, some of it you can keep for something else. I made the most unbelievable zucchini bread and was planning on doing a double post today; then I promptly ate the two last pieces before I’d taken any photos of it. I do that often, I think I’d have twice as many posts up already if I remembered to take pictures of all the things I make. Aaanyway. The two round zuckes gave me 1 ¼ cups of flesh. This of course largely depends on the size of the vegetables.

After I made the filling and stuffed the two courgettes I discovered that I had quite a bit of filling left over. I rummaged through the produce drawer in the fridge and discovered this lovely white aubergine (eggplant), so out it came. The two zuckes fit perfectly in my slow cooker (it’s only a small one), leaving no room for anything else. So now I also had to employ the services of my second slow cooker! Now that the extra room issue was solved I decided to plop some potatoes and carrots in with the aubergine as well. All set.After they cooked for about 5 ½ hours on low and were pretty much ready, I decided to make the egg lemon sauce. This is easy, but needs some attention when it’s transferred back into the slow cooker. I tempered the eggs (for more details on this see my Egg Lemon Chicken Soup) and then poured the sauce into the slow cookers with the veg and left it for about 5 minutes on low. I then tested the sauce with a food thermometer and it was well over 140F which is the minimum for cooking eggs, so I turned the cookers to warm and served shortly afterwards. The total cooking time was about 6-6 ½ hours.

Result? Gorgeous. Really tasty. And I was pleasantly surprised that they didn’t fall apart when I took them out of the slow cooker. The courgette skins had cooked to a perfect consistency. Not pull-apart-with-your-fork soft but cut-with-the-side-of-your-fork soft. The eggplant was also just right, as were the potatoes and the carrots. Success!

Slow Cooker Stuffed Zucchini in Egg Lemon Sauce
Serves 2-3

What you need:
2 large or 3 medium round courgettes (zucchini). You can use long ones, I’d say probably 4 large (I suggest you have one or two extra on hand in case you end up with lots of leftover filling. Don’t gut the extras till you know you need them, to avoid waste)
200g minced/ground meat (I used a combination or beef and pork)
½ medium onion, minced
2 Tbs fresh chopped parsley
2 Tbs fresh chopped dill weed
¼ cup risotto rice (like Arborio)
Salt and pepper
½ tsp dried thyme
1/3 cup olive oil
1 ½ cups vegetable or chicken stock
1 egg
Juice of ½ lemon

What you do:

  1. Slice off the top of the courgettes in order to form little lids. Scoop out the insides as described above, leaving a wall of flesh around the inside of the veg.
  2. Keep ¼ cup of the flesh and chop it up. Put the rest away in the fridge till you find a good recipe for it.
  3. Heat half the olive oil in a frying pan, over medium heat. Gently cook the onion being careful it doesn’t brown or burn, till it’s translucent.
  4. Add the meat to the pan, and turn up the heat to medium high. Break up the meat clumps with a wooden spoon and keep stirring till you don’t see any more pink bits.
  5. Add the parsley, dill weed, courgette flesh, rice and salt & pepper, turn down the heat a bit and continue to gently sauté over a medium heat, for about 2-3 minutes, stirring continuously.
  6. Add ¼ cup water to the pan, and let it reduce, stirring the meat mixture frequently.
  7. When the water has reduced almost completely, take the mixture off the heat and leave to cool slightly. Use a spoon to fill the vegetables with the meat mixture, leaving a couple of centimeters space from the top.
  8. Replace the lids on the vegetables and put them in the slow cooker.
  9. Add 1 ½ cups of vegetable stock to the slow cookers, so that the liquid comes up the sides of the courgettes by about 1/3.
  10. Turn slow cooker on and cook on low for about 5 ½ hours. We have mostly cooked the meat, so the only thing that needs cooking really is the rice.
  11. After 5 ½ hours try prying open one of the lids, and lifting out some filling. You will see it will have increased in volume and may now reach the top. If the rice is cooked and soft you can go on to make the egg lemon sauce.
  12. Beat the egg and lemon juice in a medium/large bowl. Slowly add spoonfuls of the cooking liquid into the egg mixture, one at a time, being careful that the egg doesn’t scramble.
  13. As you add the warm liquid you can slowly increase the size of the spoonfuls. When the mixture in your bowl is quite warm, with lots of the juice in it, take out the insert of your slow cooker and set it somewhere heat-safe. Carefully pour the egg lemon mixture back into the slow cooker, lift it and swirl it around to mix it.
  14. Put the insert back into the slow cooker and leave on low for about 5 minutes. This should do it in terms of egg cooking time.
  15. If you want to be sure, test the sauce with a thermometer; it should be over 140F.
  16. Take out the veggies, spoon some sauce over them and enjoy with fresh bread and feta cheese.

For ideas on what to do with the leftover zucchini flesh, take a wander over to Kalyn’s Kitchen. She has lots of lovely recipes for this wonderful veg, including these gorgeous Whole Wheat Zucchini Muffins with Green Chiles and Cheese. I’ve made these and they’re yummy.

Fried Meatballs And A Lack Of Inspiration

11 Sunday Mar 2012

Posted by On Top Of Spaghetti in Beef, Meat, Pork

≈ Leave a comment

Tags

beef, fried, ground, meat, meatballs, minced, pork

Check out the beautiful plate! Old French porcelain, on kind loan by The Collector.

Lately I’ve been a bit stripped of inspiration. It’s probably something to do with the hundred thoughts swimming round my brain. There are so many ideas, so many things I want to be doing… but 8 hours of work a day seem to be getting in the way. When I was younger I used to say that I would always want to work, even if I won the lottery. Well, I have seriously reconsidered THAT! Oh to win the lottery… (chances are minimum as I don’t actually play it) my life would be so full I wouldn’t have time to miss work. First of all I would buy a horse. Although with the number of people giving away theirs at the moment, I wouldn’t even need to pay for it. You see the problem with keeping a horse here in Greece is, well, “keeping” it. You pay through the nose for livery, farrier, dentist, God forbid vet, lessons and someone to exercise your horse if you can’t. It’s funny, because if I didn’t work I’d be able to do some of that myself (even the mucking out!) and the fees would be fewer. So if I did win the lottery my expenses would be less – how ironic is that?

The other thing taking up my time would be this blog and a couple of other internet projects. I’d really like to pour more time and energy into these. Wow, riding every day, cooking, baking and blogging about all the recipes I’ve tried. Yes, that’s how I’d like to spend my days please!

Hmm, now how can I tie all that to fried meatballs? I won’t even try, as I explained, I’m currently inspirationally challenged. So here’s a recipe for some really good fried meatballs, which we usually have with boiled greens when The Mister’s mum sends some up from the village. You could also serve them with a chopped tomato salad or salsa, Greek yogurt and warm pitta bread. Ooh I know, you could open up a Cypriot pitta (yes, they’re different) and stuff it with these babies, salsa and yogurt. Mm, good idea – hey was that inspiration knocking?

The recipe is by the Greek chef Christoforos Peskias, and is included in the book “Greek Cuisine” a Gastronomos magazine publication.

Fried Meatballs
Serves 3-4

You’ll need:
2 ½ Tbs olive oil, plus more for frying (or you can use any vegetable oil for frying)
1 medium onion, finely chopped
500g minced meat (I use a mix of beef and pork)
175g bread without crusts, crumbled (make sure it’s stale so it will crumble easily)
1 egg
juice of ½ a lemon
1 ½ tsp dried oregano
½ tsp dried spearmint
salt & freshly ground pepper
flour to coat meatballs

What you do:

  1. Heat the 2 ½ Tbs oil in a frying pan over medium low heat, and gently cook the onion until it is soft and translucent (confession: up until a few months ago I thought that word was trans-cu-lent! Don’t tell anyone). Remove from the heat.
  2. In a large bowl, combine the minced meat, the contents of the pan (onion and oil), breadcrumbs, egg, lemon juice, oregano, spearmint, salt and pepper. Mix with your hands and knead until well combined. Set aside for about half an hour allowing for the ingredients to mingle.
  3. Get two plates and put some flour on one of them. Take a small amount of meat mixture and roll it in the palms of your hands to form a ball, about the size of a golf ball. Then roll it around the flour a bit, so it’s all coated, but shake or tap off any excess flour. You want to be careful not to have too much flour on it because it burns while frying and affects the taste. Place the floured ball on the clean plate. Repeat until the meat mixture is all gone. (Um, I assume I don’t need to tell you to throw away the remaining flour, right?)
  4. Heat some oil in a large frying pan (here in Greece olive oil is used big time, although it is said it’s not good for frying, so I use sunflower oil – which is also cheaper). The amount of oil used will depend on the size of your pan, but basically you want it to come to at least half way up the side of the meatballs. My pan is quite large and I used about half a litre of oil. Heat it on high and make sure it’s hot before you start putting in the meatballs.
  5. Add the meatballs to the pan one by one. For me the best way to do this is with barbeque tongs. Don’t crowd them, fry in batches if they don’t all fit in at once. Leave them alone for 2 minutes and then turn them so they brown on the other side. They shouldn’t need more than about 4 minutes in total, but check to be sure. Take one out, cut it in half, and ensure the centre is no longer pink. Don’t overcook them, they just need to be golden, barely brown.
  6. Remove the meatballs from the pan and place them on a clean plate (yes I know, it’s a washing up nightmare this recipe) lined with a paper towel to absorb any oil.
  7. Enjoy while warm, or cold, doesn’t matter they’re just as good.

Note: You’ll notice that none of my recipes include garlic. This is because The Mister detests it (note the bold italics). So I don’t even try to fool him by sneaking it into anything! You can add a clove to this recipe if you want, just mince it and cook it with the onion before adding it to the meat mixture.

Bolognese Sauce, In My Favourite Kitchen Gadget

04 Sunday Mar 2012

Posted by On Top Of Spaghetti in Beef, Meat, Pasta, Slow Cooker

≈ 4 Comments

Tags

bolognese, crockpot, ground beef, meat sauce, minced meat, slow cooker, spaghetti


And now for a slow cooker recipe!

The Christmas before last, my mum and I visited my brother and his wife who live in England. My brother is a talented cook, who mostly (unlike me) relies on his imagination to throw together yummy meals. At the time, he had recently discovered the magical world of slow cookers and raved about his new appliance. One evening during our stay we had a gorgeous beef stew which was miraculously waiting for us when we got home from a hard day’s money-spending. It was cool, and I had read about slow cookers a couple of years previously thinking “I should get one of those”, but actually I was not that bothered – I have no idea why. Luckily my mum knows me better than I know myself, and when she returned to Greece two days after me, she surprised me with a gorgeous little purple Crock Pot which she had lugged all the way back for me. Well, I can safely say this has now become my favourite kitchen gadget (um, after my iphone of course).

To be honest, this didn’t happen overnight. As I mentioned in my first post I like to follow recipes. So to start using my slow cooker I turned to –where else- the internet, to find some. I searched and searched, but wasn’t very happy with what I found. It seemed that most recipes were for a pot roast of some kind and always involved tins of cream of something soup, or dried soup, or jars of ready-made sauce. Don’t get me wrong, flipping back the ring of a can of Heinz Tomato Soup is one of my favourite ways to make dinner, but “recipes” featuring, for example, a can of cream of chicken AND a can of cheese soup (which I didn’t even know existed till then) did not sound very appealing. I was starting to feel quite disappointed when I stumbled on A Year of Slow Cooking. Now that was more like it! A blog with a healthy balance of mostly “from scratch” meals, but with a few quick and easy solutions for when you just can’t be bothered! Plus the added bonus of Stephanie’s great sense of humour. That’s when I got well and truly hooked on the slow cooker. A few months later I started using Twitter (an obsession I’ll talk about another time) which introduced me to a whole new world of food blogs, such as Kalyn’s Kitchen, The Perfect Pantry, Healthy Green Kitchen to name but a few. These all include some great slow cooker recipes, and Kalyn has now started a new site called Slow Cooker From Scratch, a great place to find exciting Crock Pot recipes – and not a tin of soup in sight…!

My Bolognese Sauce is based on a recipe by a well known Greek TV chef called Elias Mamalakis, who is also the publishing manager of the Greek version of the BBC’s Olive magazine. I have adapted the original stove top recipe for the slow cooker. What I usually do is make a batch and freeze half of it, either to use in a mini lasagne for two, or for a quick, easy meal after a long day at work. I hope you like it!

Slow Cooker Bolognese Sauce
Serves 4

You’ll need:
1 Tbs olive oil
500g minced (ground) beef
3 Tbs white wine vinegar
1 Tbs onion powder or 1 small onion, chopped finely
1 tin / 400g chopped tomatoes
1 cup / 250ml tomato passata (passata is a thick juice made from crushed and sieved tomatoes. Find more information here)
½ cup / 125ml vegetable stock
1 bay leaf
1 tsp sweet paprika
1 tsp cinnamon
½ tsp allspice
1 tsp salt
½ tsp black pepper
½ tsp sugar

What you do:

  1. Heat the oil in a frying pan, over medium heat. If you are using regular onion instead of dried, add it to the pan and cook it gently until translucent, about 5 minutes. If not, heat the oil over medium high heat and start at step 2.
  2. Turn the heat up to medium high, and add the minced meat. With a wooden spoon break up the minced meat as much as possible and keep stirring until there are no more pink bits.
  3. Add the vinegar to the pan, and keep stirring the meat until the vinegar evaporates and the juices start to reduce. A couple of minutes should be fine.
  4. Using a slotted spoon, transfer the meat to the slow cooker. Add one tablespoon of pan juices. How much juice you get after frying will depend on how fatty your meat was. If it was lean you probably won’t have much, so just tip the contents of the pan into the slow cooker without worrying about slotted spoons and all that.
  5. Add the rest of the ingredients to the slow cooker. Give it all a stir.
  6. Turn slow cooker to low and cook for at least 8 hours. Mine usually stays on for about 9-9 ½. I’ve never cooked this on high, so I don’t know how long you should leave it, I assume about 5 or 6 hours?
  7. Serve over spaghetti with a generous amount of grated cheese sprinkled on top.

For those unlucky people who don’t have a slow cooker, try this:
Use 3 Tbs olive oil and only 1 cup of chopped tomatoes. Omit the stock.

  • Follow steps 1 -3 above, but in a saucepan rather than a frying pan.
  • Add chopped tomatoes and passata, bring to a boil.
  • When it starts bubbling add the spices, salt, pepper and sugar (and onion if using dried).
  • Stir and turn the heat down to medium low or low (depending on how hot your stove gets). You want a slow simmer. Cover the pan leaving a small gap and let the sauce simmer for about 45 minutes to an hour for best results.

Update on 30th Septmeber 2012:
Kalyn has kindly featured my recipe on Slow Cooker from Scratch! Yay! Check out the post for more fab slow cooker pasta sauce recipes, or the recipe index for loads more ideas.

On Top of Spaghetti

05 Sunday Feb 2012

Posted by On Top Of Spaghetti in Beef, Meat, Pasta, Pork

≈ 15 Comments

Tags

almond, baked, meatballs, recipe, spaghetti, tomato

Finally, I found a name for my blog. I’ve been thinking about starting this for months and months, but I hit a mental block when it came to choosing a name. I wanted something catchy, then I wanted something that would reflect my bilingual/bicultural background (Greek-English in case you’re wondering), then I wanted something catchy, then I wanted a food-pairing name like “sugar & spice” or “honey & thyme”… then I wanted something catchy. Then I gave up. I thought it would come to me. It didn’t. Today, I thought right, be proactive. So I turned to my buddy Mr. Google and just typed stuff in the magic box. Somehow this brought me to a nursery rhyme site and I got the bright idea to check food nursery rhymes. I was just about ready to name my blog Little Miss Muffet, when my eyes fell on the dreaded words… “On Top of Spaghetti”! The trembling started and I quickly grabbed the mouse to get away as fast as possible from the nightmare. Ok, I’m probably not making any sense right now; bear with me. When I was little, one of my aunties in England use to sing this to me. I hated it. It scared and depressed me, and made me cry. This, however, seemed to amuse certain members of my family! After all, it’s a song about meatballs, they were just teasing me (right?). Anyway for years since, whenever I’d hear the first few words I’d clasp my hands over my ears so hard I’d nearly squash my head flat. But today I thought this was a sign, an omen of some kind. Today I am meant to forgive the idiot who sneezed, and stop mourning over the loss of the poor defenseless meatball, whose life was so cruelly cut short. So I am facing my fear and in tribute, I am naming my blog after this tragic story.

And now, before you start recommending places with comfy couches (if you’ve even read this far), I’ll move swiftly on… This blog will be filled with recipes. Most of them will be other people’s, since I’m better at following instructions that creating things with my own imagination! The more I cook though, the more I’m getting a feel for doing my own thing, so occasionally there will be a triumphant creation or successful adaptation. There may be some flops too! I live in Greece but love all sorts of cuisines, so apart from say a spanakopita (spinach pie), I might also try a steak & ale pie. I hope you enjoy the recipes and tolerate the rambling.

My first recipe couldn’t be anything other than… “On Top of Spaghetti” (meatballs in tomato sauce). I found this on a great blog called Stonesoup, on a post with a collection of meals for a new mum (the author Jules’s sister). The idea was to make various meals ahead of Baby’s arrival, freeze, and enjoy at a time when cooking wouldn’t be an option. I found that to be one of the cleverest and most organized plans ever. There are quite a few evenings here when cooking is not an option so I made a big batch and froze half of it for a fuss-free after-work dinner another day. They froze fantastically. They are very easy to make and create a minimum of washing up. Win win!

Baked Meatballs in Tomato Sauce (very slightly adapted from this recipe on Stonesoup)
Serves 3-4
Cooking time about 1 hour

1 onion, finely chopped
1-2 Tbs olive oil
2 tins chopped tomatoes (you want about 800g)
1 tsp oregano or thyme or basil or mixture
1 tsp smoked paprika
½ tsp sugar
Salt & pepper
500g minced (ground) beef, or beef & pork mix
75g almond meal (I used no-skin almonds which I whizzed in the food processor as finely as possible)
2 tablespoons butter

  1. Heat olive oil in a frying pan over medium/low heat, and when it’s warm add the chopped onion. Cook gently, until it softens and becomes translucent
  2. Put half the cooked onion in a big bowl
  3. Add the tomatoes to the pan with the rest of the onion and turn up the heat. When it starts boiling add herbs, paprika and sugar, and season with salt & pepper. Turn heat down and simmer for about 10-15 minutes
  4. While sauce is simmering preheat the oven to 200C (400F)
  5. Place meat and almond meal in the bowl with the onion, and use your hands to mix. Form little meatballs no larger than a golf ball and put them on a plate
  6. Place tomato sauce in an oven proof dish or baking tin. Place meatballs on top and scatter pieces of butter over them
  7. Bake for 30-45 minutes or until browned on top and cooked through

Enjoy over spaghetti (of course!) or rice. Or mashed potatoes. Or even quinoa. They go with pretty much everything!

Sheesh, writing this blog is going to make me hungry all the time…

Click to follow me and get all my new posts delivered to your inbox!

The Foodie Corner logo

Search Other Food Blogs

Proud member of FoodBlogs
noimage
FBC5 Alumni Badge
Foodista Food Blog of the Day Badge

Categories

  • Breakfast (8)
  • Cakes and Baked Goodies (13)
  • Dessert (18)
  • Dips, Spreads, Chutneys (6)
  • Dukan Diet Friendly (16)
  • Fish & Seafood (5)
  • Meat (18)
    • Beef (9)
    • Chicken (4)
    • Pork (5)
    • Turkey (4)
  • Meatless (18)
  • Pasta (5)
  • Pies, Quiches, Frittatas (5)
  • Slow Cooker (17)
  • Soup (4)
  • Uncategorized (1)

Most Viewed

  • Easy Bougatsa (Greek Custard Pie)
  • Beetroot Brownies for Jamie's Food Revolution Day Picnic
  • Artichokes A La Polita – Slow and Not So Slow
  • An Announcement and a "Funky Pie" (with a no bake cookie ice cream cup)

Favourite Food Blogs

  • A Year of Slow Cooking
  • Brown Eyed Baker
  • Food In Jars
  • In Jennie's Kitchen
  • Kalyn's Kitchen
  • Slow Cooker From Scratch
  • The Kitchn
  • The Perfect Pantry
  • The Stone Soup
  • Two Peas and Their Pod

Horses. My other passion

  • Haynet – Equine Social Blogging Network
  • Ride With No Eyes
  • School Your Horse

Archives

  • June 2014
  • May 2014
  • March 2014
  • January 2014
  • December 2013
  • November 2013
  • October 2013
  • September 2013
  • August 2013
  • July 2013
  • June 2013
  • May 2013
  • April 2013
  • March 2013
  • February 2013
  • January 2013
  • December 2012
  • November 2012
  • October 2012
  • September 2012
  • August 2012
  • July 2012
  • June 2012
  • May 2012
  • April 2012
  • March 2012
  • February 2012

RSS Links

  • RSS - Posts
  • RSS - Comments

Now on Facebook!

Now on Facebook!

Meta

  • Register
  • Log in
  • Entries feed
  • Comments feed
  • WordPress.com

Blog at WordPress.com.

Privacy & Cookies: This site uses cookies. By continuing to use this website, you agree to their use.
To find out more, including how to control cookies, see here: Cookie Policy
  • Follow Following
    • On Top Of Spaghetti
    • Join 142 other followers
    • Already have a WordPress.com account? Log in now.
    • On Top Of Spaghetti
    • Customize
    • Follow Following
    • Sign up
    • Log in
    • Report this content
    • View site in Reader
    • Manage subscriptions
    • Collapse this bar
 

Loading Comments...