• About Me
  • About the Name
  • Recipe Index
  • On Top Of Spaghetti… στα Ελληνικα!

On Top Of Spaghetti

~ …All covered in cheese!

On Top Of Spaghetti

Monthly Archives: August 2013

Plum Crumble with a Hit of Chilli Honey

23 Friday Aug 2013

Posted by On Top Of Spaghetti in Cakes and Baked Goodies, Dessert

≈ 16 Comments

Tags

baking, chilli, cream, crumble, dessert, fruit, Gran Luchito, honey, oats, plum

Plum crumble in a baking dishIntrigued by the title? I’ll get right to the point. One of the best things I tried at the FBC5 food blogger conference was the Gran Luchito Smoked Chilli Honey. I spent quite some time skulking around the Gran Luchito food stand during the breaks, trying to look inconspicuous while eyeing the crackers and cheese, ready to pounce as soon as there was a tiny bit of space among the crowds. I would grab a chunk of cheese, pop it on a cracker, and smother the whole thing with the smoked chilli honey. Then I’d walk away, wait 3 minutes and go back, hoping the lovely girl at the stand had forgotten me. I’m sure she must have been rolling her eyes every time!

May I just say at this point that this is not a sponsored post or anything. I just loved that stuff. It’s made with a special type of rare Mexican chillies. Now, it is actually possible to order it on Amazon, but the postage to Greece for one jar is more than what I paid for a big box with an electrical appliance in it a couple of weeks ago. So, having been lucky enough to snap up a sample of the Smoked Chilli Paste (the base for the honey and the gorgeous Gran Luchito Mayo) I decided to improvise and made my own. It was not the same, but it was still very good. Greek honey is top quality and the paste packs so much amazing smoky flavour that the result was far from disappointing. Ever since trying it in London, I’ve been thinking I would like to add it to a dessert. Don’t ask why, it just stuck in my mind. When I recently found myself with a batch of wonderfully ripe and juicy plums, I had one of those light bulb moments. Macerate them in this honey, cover them with a dark sugar and oat crumble, and bake. It just sounded so right. And it was. So so right. Every once in a while I have some bloody good ideas – if I may say so myself!

In case you are worried, this is not spicy hot. You can’t really tell there is chilli in it. But it gives the fruit a depth and warmth that is hard to explain (wow, depth and warmth… I’m becoming a real food writer… I’ll be saying the flavour “pops” next). But seriously, depth and warmth are the closest I can get to helping you imagine its awesomeness (aaand the writer has left the building).

Plum Crumble with a Hit of Chilli Honey

Ingredients

For the fruity bit

60g clear runny honey (sorry, I forgot to measure in Tbs – I think that’s about 2?)
1/8 tsp Gran Luchito Smoked Chilli Paste
500g (7 smallish) ripe plums, cut into quarters
1/8 tsp nutmeg
1 Tbs all purpose flour

For the crumbly bit

½ cup (8 Tbs) rolled oats
4 Tbs dark muscovado sugar
4 Tbs white granulated sugar
5 Tbs all purpose flour
1/8 tsp salt
4 Tbs cold butter, cut into cubes

Instructions

1. Mix the honey and chilli paste in a medium sized bowl and heat in the microwave for 15 seconds or so, just so it liquefies a little.
2. Toss the plum pieces in the honey so they are all coated and set aside for half an hour or so to macerate, mixing once in a while.
3. Preheat oven to 180C (or 160C on fan).
4. In another bowl mix the dry crumble ingredients, then add the butter and rub with your fingers till the mixture resembles coarse crumbs.
5. Add the nutmeg and flour to the plums, and mix well. Pour into a pie dish or pyrex dish, and sprinkle the crumble mixture over the top.
6. Bake for approx. 30 minutes, till the top looks crispy and the fruit is bubbling up the sides of the dish.
7. Serve with cream. Or try mixing a little bit of single cream into a tub of mascarpone and using that. You’ll like it (unless there is something seriously wrong with you – sorry).

Note: Obviously if you are lucky enough to get your hands on some Gran Luchito Smoked Chilli Honey, you can use that instead of making your own. Or you can just send it to me, I don’t mind.

Other wonderful looking plum crumbly things
Plum Crumble by Orangette (it has ginger in it!)
Plum Crumble Bars by The Cilantropist
Hazelnut Plum Crumb Tart by Smitten Kitchen

Easy Slow Cooker Dulce De Leche (Caramel)

18 Sunday Aug 2013

Posted by On Top Of Spaghetti in Dessert, Dips, Spreads, Chutneys, Slow Cooker

≈ 5 Comments

Tags

caramel, condensed milk, crockpot, dessert, slow cooker

Two ramekins with caramel in the slow cooker insertPsst! Hi! Just a quick post because I really should be doing other things right now…

You know in my last post how I mentioned slathering dulce de leche over vanilla ice cream in a cookie cup? Well, there’s a really easy way of making your own caramel, using sweetened condensed milk. Granted, it’s not easier than just buying it off the shelf in civilised countries like the US and the UK, but for those who live in villages (i.e. Greece) all you need is a slow cooker and the process is headache free. For a long while I used the “boiling-cans-in-water” method, which works fine but a. I was checking on the saucepan every 10 minutes worried about exploding cans and caramel coated kitchen walls, and b. I didn’t like the idea of the milk bubbling away in a tin for over 2 hours. I’m sure there are other ways, like maybe a water bath in the oven? But who wants their oven on for so long?

You can adapt this method to your own slow cooker; if it’s a large one you might get more quantities in. Just check how many heat-proof ramekins (or coffee mugs should work) fit in the slow cooker insert. My 3.5L slow cooker takes 2 ramekins which in turn take one tin of condensed milk. If yours fits more ramekins, use more milk. The caramel keeps well in the fridge in an old jam jar.
three photos of the preparation process

Ingredients

1 tin sweetened condensed milk, approx. 400g (the thick creamy milk that has sugar in it, not the evaporated milk that we dilute with water)
hot water for the slow cooker insert

Instructions

1. Fill the slow cooker insert with water to create a bath for the ramekins (water should come half way or 3/4 way up the sides). Keep in mind that when you put them in, the water level will rise!
2. Pour the condensed milk into the ramekins and put them into their bath.
3. Cover with foil so the condensation doesn’t fall back into the milk (see photos).
4. Turn slow cooker on to high and leave for about 4-5 hours. Adjust timings if your slow cooker tends to cook a little faster. You can check the progress by carefully peeking under the foil. Caramel is done when it has turned the colour of, um, caramel. The longer you leave it, the darker and thicker it will get. Mine is good after 5 hours.

Other cool ideas for your slow cooker
Slow Cooker Jacket (Baked) Potatoes, my most popular post ever
Hot Dogs for a Crowd, by A Year of Slow Cooking
CrockPot Play Dough Recipe, by A Year of Slow Cooking

An Announcement and a “Funky Pie” (with a no bake cookie ice cream cup)

09 Friday Aug 2013

Posted by On Top Of Spaghetti in Dessert

≈ 11 Comments

Tags

caramel, cookie, dessert, digestive biscuits, dulce de leche, funky pie, ice-cream, no bake cookie cup, vanilla, whipped cream

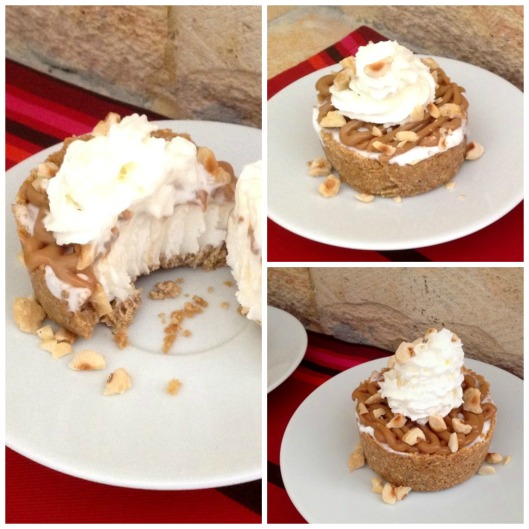
Three photos of a funky pie, one of them opened up to reveal the ice-cream centreYou know back in January when I told you all about my job change? I said I’d give more details about the new venture in due course, then never mentioned anything again. Well. Where to begin? I stayed at the startup for 4 months, during which I gained a whole load of experience and useful knowledge. However, it turned out that the job wasn’t really for me. After much thought and many discussions with The Mister, we decided to consider doing something of our own. However, for both of us to give up paid jobs in order to venture into the great unknown seemed a bit silly. Well, very silly. So, he came up with this idea. Seriously, it was his idea. “Why don’t you become a professional food blogger?” he said. At first I thought I should book a doctor’s appointment for him. But then we talked some more, and some more, and it started making sense. For us it did anyway (if you ask my dad he might disagree). Sure, I will have no income for a looong time, but with The Mister’s support, and some savings, I can concentrate on building up a good blog and maybe even getting some people to read it. There are also a million other ideas swimming around in my brain for all sorts of projects, things I have always been interested in doing, and the great thing is that they can all cozy up under the umbrella of a food blog. For example an e-shop, or an e-cookbook, that sort of thing. Um, obviously all food related.

As we began to put a little plan together, it became apparent that the market I should aim for is the Greek one. So my new food blog is going to be in the Greek language. This may disappoint some of my (very few but loyal) readers, but it’s the sensible thing to do. The global food blogging scene is chockablock full of amazing websites, awesome writers, magnificent food photographers and downright genius recipe developers. Just the thought of trying to compete sends me running for the hills… Not that there aren’t some extremely talented Greek bloggers out there; I hope they’ll welcome me and share their knowledge and experience with me!

So, that’s what going on around here. My new site is being professionally designed and developed (gulp) and is looking really cool. Now I’m in a bit of a panic, trying to get my head together to produce some half-decent content to match the design. It’s crazy scary. But crazy exciting. Wish me luck! Oh and in case you are wondering, On Top Of Spaghetti will continue to exist and I will try my best to post as regularly as possible. If I disappear for a while please be patient, I will surely turn up at some point!

The recipe I’m posting today is something I developed myself, in an effort to copy a dessert I had while out with my auntie in London. We went for a lovely dinner to her local Thai restaurant, somewhere she goes very often with her grandsons. My auntie hates sweets (I know… even ice-cream… I don’t get it…) but she strongly recommended the Funky Pie as it’s what the boys always always end their meal with. Can I just say? My nephews know a good dessert when they see one. I bring to you, my version of The Funky Pie. (I still can’t believe how close I got to the real thing!)

“Funky Pie” with a no bake cookie ice-cream cup

Ingredients

150g digestive biscuits or graham crackers
50g plus 4-6 tsp roasted hazelnuts, chopped (I prepped 100g total and had lots leftover)
70g butter, melted
4 good scoops of vanilla ice cream
4 Tbs dulce de leche or caramel sauce
4 squirts whipped cream from a can (sometimes you just have to go there)

Instructions

1. Whizz biscuits and 50g of chopped hazelnuts in a food processor till fine. Mix in the melted butter and use your hands to incorporate. You want the mixture to hold when you squeeze some in your hand. Sort of wet-sandy texture.
2. Cut 4 strips of grease proof paper, about 4-5cm width. Each strip should be long enough to line the base and two sides of a shallow ramekin with both ends hanging over the sides. You will use this as a handle to pull out the biscuit (cookie) cup when set. Very lightly grease 4 ramekins and line as described (I used the few drops of butter that were left in the saucer after melting it).
3. Put some crumb mixture into each ramekin and press into place with your fingers, along the bottom and up the sides as best you can. The aim is to create a cup which will later hold the ice cream. Pay attention to the corners around the bottom, pressing in with your fingers. This is quite a faffy step, but it’s the only one that requires any sort of effort! So be patient, it’s worth it. Add more biscuit mixture as you work, building up the sides. Note: With this amount of crumb mixture my fourth cup had shorter sides. Pop each ramekin into the freezer as you complete it.
4. Take out the vanilla ice-cream and let it soften for a few minutes. Don’t let it melt, or it will crystallise when freezing again. You want it just soft enough to be pliable and squish-able. Squish it into the biscuit cups inside the ramekins. Put back in the freezer.
5. When ready to serve, pull the paper “levers” up gently so the cup is released from the ramekin. Place on a plate. Spread the top with dulce de leche or caramel sauce. If you want to be fancy you can use a piping bag, unless you are using sauce in a squeezy bottle in which case your life is much easier at this point.
6. Sprinkle chopped hazelnuts on top of the sauce. You can add other nuts here as well, peanuts would probably be nice (salted… to go with the caramel… you know… salted caramel… why did I only just think of that?)
7. Squirt the whipped cream on top of all that. Serve with a fork as well as a spoon, the biscuit can be a bit hard to dig into!

Note: Of course you can use this as a base and let your imagination run riot. Different flavour ice-cream, different sauces (chocolate, sour cherry etc.), different nuts. Whatever you fancy. It’s all good.

Turns out this has been done before..! (but in baked versions)
Chocolate Chip Cookie Ice Cream Cups from Chocolate-Covered Katie (a healthy version)
Chocolate Cookie Ice Cream Bowls by Kirbie’s Cravings
Edible Ice Cream Bowls: Gluten Free Chocolate Chip Cookies by Gluten Free on a Shoestring

Back from #FBC5 with a Greek Yogurt & Chocolate Spread “Cheesecake” in a Glass

04 Sunday Aug 2013

Posted by On Top Of Spaghetti in Dessert

≈ 15 Comments

Tags

cheesecake, choco bella, chocolate, chocolate spread, dessert, digestive biscuits, Greek yogurt, nuts

Head on view of three Greek yogurt and chocolate spread cheesecakes in a glass with hazelnuts and biscuit toppingRemember last post? No? I’m not surprised. It was ages ago (sorry). I was just about to leave for the #FBC5 conference in London. And what a fab experience that was! I think for a food blogger, the best part of going to a food blogger conference is the fact that you can be your true self when confronted with amazing food in a room full of people. In other words, you can whip your iphone out and instagram every single step of that spoonful of chili honey, on its journey from the jar, to the top of the cheese on the cracker, all the way to your mouth. And no one will bat an eyelid. In fact, you might find a line of people behind you, smartphones at the ready, waiting patiently for you to get out of the way so they can do the same.
FBC5_01
FBC5_02
And of course there is all the information that you absorb, a whole load of useful tips, nuggets of advice and wisdom, ideas and suggestions. But the main thing I’ve taken home with me after those three days in the London sunshine, is the fact that I have a whole new bunch of likeminded friends. It was especially great to spend more time with my fellow Greek bloggers, who made the journey from Athens like I did. A total of 5 of us attended, which in my opinion is a huge number for such a small country. Most of them I had met before, but this was a brilliant opportunity to have a natter about our local food blogging scene, and throw about some ideas about how we can do stuff here. It was also quite funny to hear them talk about the pork scratchings they mistook for crisps… let’s just say they were not impressed. They don’t know what they’re missing…
FBC5_03
FBC5_04
The photos here are a collage of my Instagram feed during the #FBC5 weekend. Most are from the actual conference, with a few random London pics in there too. You can also see them on Facebook with a few comments. For a more comprehensive account of #FBC5, the sessions, the food, the sponsors, go over to the website and have a browse through all the related posts. I will just say two things. Chili honey. Maple butter. I dream about them.
FBC5_05
FBC5_06
I was planning on posting a recipe based on one by my new friend Janie over at The Hedge Combers. She is just the sweetest person and I’m so happy to have met her. A kitchen disaster involving falling baking trays and sticky floors made that impossible. Those amazing flapjacks will have to wait just a little longer. Since today is really hot (the air coming through the window is like a hair dryer blowing in your face) I decided to try out something else, which doesn’t involve the oven, but does use one of the goodies that came in our extremely heavy #FBC5 goodie bags. Choco Bella, a fairtrade organic dark chocolate hazelnut spread made by Italian company Damiano. It’s veeery gooood. This “cheesecake” in a glass is dead easy to make, has few ingredients, and is very light (no cream or cream cheese here – just lovely healthy Greek yogurt). The yogurt gives it a slightly tangy taste which goes nicely with the very chocolatey spread. Here goes.
3 Greek Yogurt Chocolate Spread Cheesecakes in a glass placed on a long white plate

Greek Yogurt & Chocolate Spread “Cheesecake” in a Glass

Ingredients

140g digestive biscuits (or graham crackers) + 1 extra biscuit for garnishing (optional)
20g hazelnuts, chopped
2 Tbs melted butter or margarine
200g (3/4 c.) Greek yogurt (I used 2%)
150g (about 7 ½ Tbs) Choco Bella chocolate & hazelnut spread
1 Tbs icing (confectioner’s) sugar

Instructions

1. Crush biscuits in a bowl. You can use your fingers as we aren’t bothered about getting the crumbs very fine.
2. Take 4 small pinches of chopped hazelnuts and set aside for garnishing later (if you want). Mix the rest of the chopped hazelnuts into the biscuit crumbs. Add the melted butter or marge and mix with your fingers till the crumbs are coated. The mixture won’t come together as it would for a cheesecake base, we only want loose crumbs for the glass. Spoon 2 tablespoons of crumb mixture into 4 smallish glasses. Set aside.
3. In a medium sized bowl, combine the yogurt, chocolate spread and icing sugar. I used an electric whisk thinking it might make the mixture fluffier. I don’t know if it did. You can also mix with a regular whisk till incorporated.
4. Spoon 2 tablespoons of mixture onto the crumbs in the glasses. Then add another tablespoon of crumbs on top. Finally, add another layer of chocolate mixture. My last layer was just under 1 tablespoon in each glass. Sprinkle the remaining hazelnuts over the top and garnish with one quarter of the biscuit on each “cheesecake” if desired.

Notes:
– The Choco Bella chocolate spread is quite chocolatey, so if you are using any other brand I would suggest starting with less yogurt (maybe the same quantity as the chocolate spread) and tasting it. Adjust according to your taste buds!

Before I go, a special mention and “lovely to meet you” for a few more bloggers from the event.
Louiza from Chez Foti
Vanesther from Bangers & Mash
Bintu from Recipes from a Pantry
Magda from Midnight Spoon
Madeleine from From the Healthy Heart
Manjiri from Slice off me
Snejana from Orange Thyme
Emma Jane from Cakes and Catwalks
Karin from Yum and More
Karen from Lavender and Lovage

And of course my Greek blogger friends
Artemis from Wonderfoodland (bilingual blog)
Athina from Sugar Buzz (Greek blog)
Nicky from Sugar Flowers Creations (Greek blog)
Elena from Elena’s Cooking (bilingual blog)

Click to follow me and get all my new posts delivered to your inbox!

The Foodie Corner logo

Search Other Food Blogs

Proud member of FoodBlogs
noimage
FBC5 Alumni Badge
Foodista Food Blog of the Day Badge

Categories

  • Breakfast (8)
  • Cakes and Baked Goodies (13)
  • Dessert (18)
  • Dips, Spreads, Chutneys (6)
  • Dukan Diet Friendly (16)
  • Fish & Seafood (5)
  • Meat (18)
    • Beef (9)
    • Chicken (4)
    • Pork (5)
    • Turkey (4)
  • Meatless (18)
  • Pasta (5)
  • Pies, Quiches, Frittatas (5)
  • Slow Cooker (17)
  • Soup (4)
  • Uncategorized (1)

Most Viewed

  • Easy Bougatsa (Greek Custard Pie)
  • Beetroot Brownies for Jamie's Food Revolution Day Picnic
  • Artichokes A La Polita – Slow and Not So Slow
  • An Announcement and a "Funky Pie" (with a no bake cookie ice cream cup)

Favourite Food Blogs

  • A Year of Slow Cooking
  • Brown Eyed Baker
  • Food In Jars
  • In Jennie's Kitchen
  • Kalyn's Kitchen
  • Slow Cooker From Scratch
  • The Kitchn
  • The Perfect Pantry
  • The Stone Soup
  • Two Peas and Their Pod

Horses. My other passion

  • Haynet – Equine Social Blogging Network
  • Ride With No Eyes
  • School Your Horse

Archives

  • June 2014
  • May 2014
  • March 2014
  • January 2014
  • December 2013
  • November 2013
  • October 2013
  • September 2013
  • August 2013
  • July 2013
  • June 2013
  • May 2013
  • April 2013
  • March 2013
  • February 2013
  • January 2013
  • December 2012
  • November 2012
  • October 2012
  • September 2012
  • August 2012
  • July 2012
  • June 2012
  • May 2012
  • April 2012
  • March 2012
  • February 2012

RSS Links

  • RSS - Posts
  • RSS - Comments

Now on Facebook!

Now on Facebook!

Meta

  • Register
  • Log in
  • Entries feed
  • Comments feed
  • WordPress.com

Blog at WordPress.com.

Privacy & Cookies: This site uses cookies. By continuing to use this website, you agree to their use.
To find out more, including how to control cookies, see here: Cookie Policy
  • Follow Following
    • On Top Of Spaghetti
    • Join 142 other followers
    • Already have a WordPress.com account? Log in now.
    • On Top Of Spaghetti
    • Customize
    • Follow Following
    • Sign up
    • Log in
    • Report this content
    • View site in Reader
    • Manage subscriptions
    • Collapse this bar
 

Loading Comments...