• About Me
  • About the Name
  • Recipe Index
  • On Top Of Spaghetti… στα Ελληνικα!

On Top Of Spaghetti

~ …All covered in cheese!

On Top Of Spaghetti

Category Archives: Dessert

Mince Pie Thumbprint Cookies

23 Monday Dec 2013

Posted by On Top Of Spaghetti in Cakes and Baked Goodies, Dessert

≈ 8 Comments

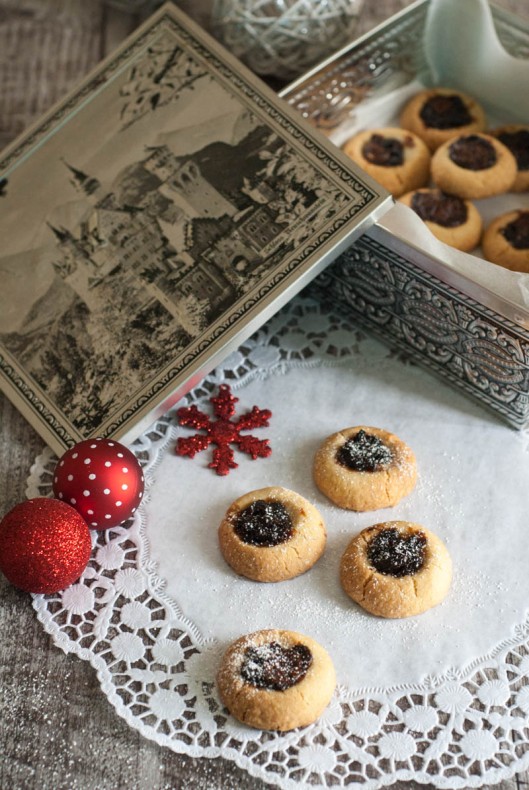
Mince Pie Thumbprint CookiesHow about a really really quick post? I feel awful about the way I am neglecting my little Spaghetti blog, and I was just over at The Foodie Corner writing this recipe when I suddenly thought this is too good not to post here as well.

A few days ago I was in the middle of making mince pies and was getting a bit frustrated with the whole muffin tin pie dough combo, when it suddenly occurred to me that the dough I was handling would probably behave better as a biscuit (as in cookie for my US friends). Then I got an image of a thumbprint biscuit in my mind and decided that a blob of mincemeat would look pretty cute (and taste pretty good too). So, the rest of the dough was rolled into little balls and transformed into these little cuties. Bite sized mince pie biscuits that you can enjoy with a cuppa or plop in a bowl and devour with lashings of cream. Just like a proper mince pie, minus the faff.

The mincemeat I used was the Thursday Cottage brand which is pretty amazing. Even more amazing is the fact that you can get it in Greece! The pastry is lovely and sweet so they make a great pair. I have managed to keep a few of these and I’m hoping I can stay away from the biscuit tin long enough to enjoy them on Christmas Day. Now I have to go because just thinking of them is making that pretty difficult…

Have a wonderful Christmas and a fantastic New Year everyone!

Mince Pie Thumbprint Cookies

(Original recipe for mince pies is from the BBC Good Food magazine)

Ingredients

300gr mincemeat
75gr dark chocolate, chopped
375gr cold butter, cubed
600gr all purpose flour
225gr brown granulated sugar
icing sugar for sprinkling (optional)

Instructions

1. Mix mincemeat and chocolate in a bowl and set aside.
2. Place butter and flour in a large bowl and rub with your fingers till it resembles crumbs. Add the sugar and squeeze with your hands till the mixture forms a dough. It will be very crumbly to start with, be patient and keep kneading till it comes together.
3. Preheat oven to 200C (180C fan). Make little balls of dough and place them on lined baking trays, spaced apart. Press the back of a round measuring spoon into the top so that the ball is flattened slightly and an indentation is formed. If you don’t have round measuring spoons use your thumb. Fill each indentation with some mincemeat but don’t let it spill over. Bake for approx. 15 to 20 minutes, depending on your oven and the size of the cookies. Start checking after 10 minutes. They should be a light golden colour.
4. Remove from the oven and let them cool on the tray (they will continue to cook for a little while). When completely cool sprinkle with icing sugar if desired.

Note: This is not a sponsored post and I have received no compensation or free products for mentioning the brand. I just thought it was really tasty and you all deserve to know that!

Easy Bougatsa (Greek Custard Pie)

27 Wednesday Nov 2013

Posted by On Top Of Spaghetti in Cakes and Baked Goodies, Dessert, Pies, Quiches, Frittatas

≈ 15 Comments

Tags

bougatsa, custard, dessert, fyllo pastry, Greek, sweet

Easy Bougatsa (Greek Custard Pie)
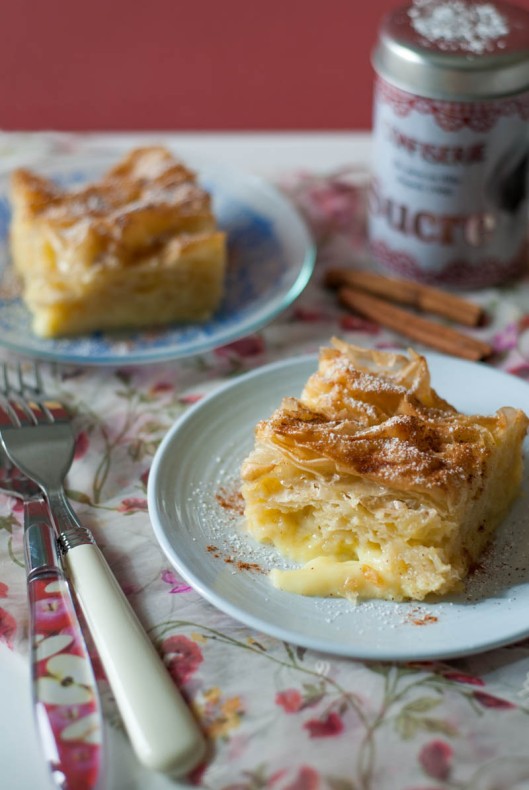
If you’ve been to Greece, chances are you’ve tried bougatsa. Maybe for breakfast one morning before hitting the beach? Or after stumbling upon a small bakery with a batch of pies fresh out of the oven? Bougatsa is the one with the fyllo pastry wrapped around a thick creamy white custard, with icing sugar and cinnamon sprinkled on top. It’s good. It’s very very good.

Luckily there’s a way to make it easily, without faffing around with buttering flimsy sheets of pastry that dry out if not kept under a damp towel, etc etc. Some people call it the lazy woman’s bougatsa. I’m not sure about you, but any recipe with the words “the lazy woman’s…” in its title, is going to get my attention.

This particular recipe is ridiculously easy. I should say dangerously easy, as whipping up a dish of this bougatsa with such little effort could mean ill-fitting jeans are in your imminent future. And it keeps well in the fridge; in fact it gets better during the two days after it’s baked. However, I have very kindly made a small batch here, so it shouldn’t do too much damage. Unless you make it every two days!

The original idea to make this came from the blog Funky Cook (in Greek) and the recipe I used is from the blog Sugar Flowers Creations (in Greek).

Easy Bougatsa just out of the oven

Easy Bougatsa (Greek Custard Pie)

Ingredients

250gr fyllo pastry
125gr butter, melted
3 eggs
1/2 c. milk
1/2 c. sugar
1/2 tsp vanilla extract
icing sugar and cinnamon for dusting

Instructions

1. Lightly grease a rectangular baking dish (mine is 25x16cm) and preheat your oven to 180C. Take each sheet of pastry and gather it/bunch it up widthways. Put one sheet next to the other in the dish, bunched up. (If this doesn’t make much sense you can check the pictures in the original recipe here, and also here.)
2. Drizzle the melted butter over the pastry in the dish. Pop it in the oven and bake for about 10 minutes or until it starts to go a golden colour.
3. While the fyllo is baking, beat the eggs lightly and add the milk, sugar and vanilla. Whisk until smooth. Pour the egg mixture over the half-baked fyllo. Move the dish a bit so it’s distributed evenly and return it to the oven.
4. Bake for another 20-30 minutes, or until golden. Let it cool slightly.
5. To serve, sprinkle with icing sugar and cinnamon. I did that separately for each portion at the time of serving. Store it in the refrigerator but it’s best served warm (about 15 seconds in the microwave will do the trick nicely for each individual piece).

Note: If you want a proper sized bougatsa pie, double all the ingredients execpt the eggs, of which you will need 5.

Other classic Greek desserts
Galaktoboureko by Elena’s Cooking
Cream Horns from Sabor by Conna
Samali from Sabor by Conna

Mini Dukan Lemon Cheesecakes and a Sneak Preview of The Foodie Corner

19 Thursday Sep 2013

Posted by On Top Of Spaghetti in Cakes and Baked Goodies, Dessert, Dukan Diet Friendly

≈ 11 Comments

Tags

baking, cheesecake, dessert, diet, dukan, Dukan diet friendly, egg, Greek yogurt, lemon, low fat, oat bran

The Foodie Corner logoLike it? The Foodie Corner is soon to become a reality. From wire frames and sample pages to a real live blog. Just a few weeks (or even days) away now! I know most of you won’t be able to follow me there as it’s going to be in Greek (unless you’ve been taking lessons?) but I really wanted to share this image here so you guys have a small sneak preview of what is to come. I have no intention of dropping On Top Of Spaghetti, and after the first few months of ups and downs I aim to be back blogging here as often as possible. In the meantime, what do you think? Cool isn’t it? I have been working with a fabulous team of designers and developers, whom I will introduce in a later post (when you have more than just the one image to see!). They have done such a great job. So I’m adding this little gem of a picture to my side bar!

At first I thought I would just post this without a recipe. But you know me. Can’t write anything on here without sharing something delicious. And today I have an extra special treat; a Dukan dessert. I’m not on this diet anymore, but once in a while I will have a Pure Protein day (or two) because it makes me feel better. Just to remind you, the diet is based on protein and vegetables, cutting out fat and carbs. I know the human body needs fat and carbs, but this human also needs to fit into certain jeans. So a little Dukan Attack here and there won’t kill me. Also, I enjoy thinking up recipes that will help those who are on the diet. Like this one!
Mini Dukan Lemon Cheesecakes
These mini Dukan lemon cheesecakes are based on two recipes. The first is for Dukan cookies, which I thought could be my base if made in mini form (digestives and graham crackers are sadly not allowed!). The second is a lightened up version of lemon and blueberry cheesecake using lemon flavoured yogurt, on the blog “Whatever Gets You Through The Day”. Iris took part in a challenge and used a lemony yogurt to create this lovely looking dessert. It’s pretty light as it is but not quite suitable for the Dukan Diet, so I got to thinking of ways to adapt it. There is a dairy company here in Greece called Mevgal, which produces this amazing 1% lemon yogurt. It’s like no other I’ve ever tried. (And I’m not getting paid or compensated in any way for saying that! I just love it.) For a while now I’ve been thinking of making some sort of cheesecake with it, and this seemed like the perfect opportunity. So, with a bit of mixing and matching, I came up with these babies! I still can’t believe how close they are to real cheesecake! Ok, the base is not like a biscuit base, it’s much softer and -let’s be honest- not as tasty, but it does provide a nice contrast to the lemony filling. When I offered one to The Mister he didn’t believe they were Dukan approved, he was worried that at 23:50 I had finally given in and spoiled the Pure Protein day. Now that was a good sign. I had quite a bit of leftover filling because my mini muffin pan is very mini. So I just poured it into ramekins and baked it alongside the little guys, without a base. This too was very nice, I’ve just finished one now. Just sweet enough and very cheesecakey! This morning I had one with a teaspoon of raspberry jam on. Mmm! But that’s only for non-Dukaners. Right, I’ve gone on about this too much. Here is the recipe!

Mini Dukan Lemon Cheesecakes

Ingredients

For the base
1 egg
3 Tbs oat bran
1 tsp baking powder
1 Tbs Splenda or equivalent sweetener
2 Tbs plain yogurt (mine was 1.5% fat)

For the cheesecake filling
1 x 200g pot lemon flavoured Greek yogurt (mine was 1% fat)
100g low fat cream cheese (mine was 5% fat – a tiny cheat as it should be below 2%)
1 Tbs oat bran
1 tsp vanilla extract
1 Tbs Splenda or equivalent
2 egg whites (mine were pretty large)

Instructions

1. Preheat oven to 180C (160C fan)
2. For the base: Mix all the ingredients in a bowl. Pour mixture into a non-stick 12-hole mini muffin tin (a regular muffin tin would work too, you’d probably get 6 or 8). You only want a little bit of mixture in the bottom of each mould, remember this is the base. Pour any leftover mixture into individual muffin moulds, you can make more cheesecakes or leave them plain – they would be lovely with scrambled egg!
3. Bake for 10-15 minutes till lightly browned (see note at end).
4. In the meantime mix all the filling ingredients together (you can use the same bowl for less washing up! yay!).
5. Take the muffin tin out of the oven and pour filling over each little oat bran base. Fill to the top, these will rise a little then fall back down. Pour any leftover mixture into some ramekins or over the stray muffins from above. Pop them back in the oven for about 20-25 minutes till set and lightly browned (see note).
6. Take out of the oven. You will be excited at how nice and fluffy and risen these will look while baking; be prepared to see them sink back down! But that’s ok because they taste good.

Note: I think with these times mine turned out a little overbaked as they were sliiiightly dry. This might just be due to the ingredients, especially the oat bran, but I think it was the time in the oven. Iris made a whole cheesecake and baked hers for 25 minutes so I think my tiny muffins really didn’t need that long! I liked the fact that they were browning (goodness knows why) and left them, but next time I will check at 15′ by touching the surface. If it’s set I’ll take them out. Don’t forget the base has already been cooking quite a while.
Also noteworthy is the fact that these are much better the day after! Sounding all the more like proper cheesecake!

Plum Crumble with a Hit of Chilli Honey

23 Friday Aug 2013

Posted by On Top Of Spaghetti in Cakes and Baked Goodies, Dessert

≈ 16 Comments

Tags

baking, chilli, cream, crumble, dessert, fruit, Gran Luchito, honey, oats, plum

Plum crumble in a baking dishIntrigued by the title? I’ll get right to the point. One of the best things I tried at the FBC5 food blogger conference was the Gran Luchito Smoked Chilli Honey. I spent quite some time skulking around the Gran Luchito food stand during the breaks, trying to look inconspicuous while eyeing the crackers and cheese, ready to pounce as soon as there was a tiny bit of space among the crowds. I would grab a chunk of cheese, pop it on a cracker, and smother the whole thing with the smoked chilli honey. Then I’d walk away, wait 3 minutes and go back, hoping the lovely girl at the stand had forgotten me. I’m sure she must have been rolling her eyes every time!

May I just say at this point that this is not a sponsored post or anything. I just loved that stuff. It’s made with a special type of rare Mexican chillies. Now, it is actually possible to order it on Amazon, but the postage to Greece for one jar is more than what I paid for a big box with an electrical appliance in it a couple of weeks ago. So, having been lucky enough to snap up a sample of the Smoked Chilli Paste (the base for the honey and the gorgeous Gran Luchito Mayo) I decided to improvise and made my own. It was not the same, but it was still very good. Greek honey is top quality and the paste packs so much amazing smoky flavour that the result was far from disappointing. Ever since trying it in London, I’ve been thinking I would like to add it to a dessert. Don’t ask why, it just stuck in my mind. When I recently found myself with a batch of wonderfully ripe and juicy plums, I had one of those light bulb moments. Macerate them in this honey, cover them with a dark sugar and oat crumble, and bake. It just sounded so right. And it was. So so right. Every once in a while I have some bloody good ideas – if I may say so myself!

In case you are worried, this is not spicy hot. You can’t really tell there is chilli in it. But it gives the fruit a depth and warmth that is hard to explain (wow, depth and warmth… I’m becoming a real food writer… I’ll be saying the flavour “pops” next). But seriously, depth and warmth are the closest I can get to helping you imagine its awesomeness (aaand the writer has left the building).

Plum Crumble with a Hit of Chilli Honey

Ingredients

For the fruity bit

60g clear runny honey (sorry, I forgot to measure in Tbs – I think that’s about 2?)
1/8 tsp Gran Luchito Smoked Chilli Paste
500g (7 smallish) ripe plums, cut into quarters
1/8 tsp nutmeg
1 Tbs all purpose flour

For the crumbly bit

½ cup (8 Tbs) rolled oats
4 Tbs dark muscovado sugar
4 Tbs white granulated sugar
5 Tbs all purpose flour
1/8 tsp salt
4 Tbs cold butter, cut into cubes

Instructions

1. Mix the honey and chilli paste in a medium sized bowl and heat in the microwave for 15 seconds or so, just so it liquefies a little.
2. Toss the plum pieces in the honey so they are all coated and set aside for half an hour or so to macerate, mixing once in a while.
3. Preheat oven to 180C (or 160C on fan).
4. In another bowl mix the dry crumble ingredients, then add the butter and rub with your fingers till the mixture resembles coarse crumbs.
5. Add the nutmeg and flour to the plums, and mix well. Pour into a pie dish or pyrex dish, and sprinkle the crumble mixture over the top.
6. Bake for approx. 30 minutes, till the top looks crispy and the fruit is bubbling up the sides of the dish.
7. Serve with cream. Or try mixing a little bit of single cream into a tub of mascarpone and using that. You’ll like it (unless there is something seriously wrong with you – sorry).

Note: Obviously if you are lucky enough to get your hands on some Gran Luchito Smoked Chilli Honey, you can use that instead of making your own. Or you can just send it to me, I don’t mind.

Other wonderful looking plum crumbly things
Plum Crumble by Orangette (it has ginger in it!)
Plum Crumble Bars by The Cilantropist
Hazelnut Plum Crumb Tart by Smitten Kitchen

Easy Slow Cooker Dulce De Leche (Caramel)

18 Sunday Aug 2013

Posted by On Top Of Spaghetti in Dessert, Dips, Spreads, Chutneys, Slow Cooker

≈ 5 Comments

Tags

caramel, condensed milk, crockpot, dessert, slow cooker

Two ramekins with caramel in the slow cooker insertPsst! Hi! Just a quick post because I really should be doing other things right now…

You know in my last post how I mentioned slathering dulce de leche over vanilla ice cream in a cookie cup? Well, there’s a really easy way of making your own caramel, using sweetened condensed milk. Granted, it’s not easier than just buying it off the shelf in civilised countries like the US and the UK, but for those who live in villages (i.e. Greece) all you need is a slow cooker and the process is headache free. For a long while I used the “boiling-cans-in-water” method, which works fine but a. I was checking on the saucepan every 10 minutes worried about exploding cans and caramel coated kitchen walls, and b. I didn’t like the idea of the milk bubbling away in a tin for over 2 hours. I’m sure there are other ways, like maybe a water bath in the oven? But who wants their oven on for so long?

You can adapt this method to your own slow cooker; if it’s a large one you might get more quantities in. Just check how many heat-proof ramekins (or coffee mugs should work) fit in the slow cooker insert. My 3.5L slow cooker takes 2 ramekins which in turn take one tin of condensed milk. If yours fits more ramekins, use more milk. The caramel keeps well in the fridge in an old jam jar.
three photos of the preparation process

Ingredients

1 tin sweetened condensed milk, approx. 400g (the thick creamy milk that has sugar in it, not the evaporated milk that we dilute with water)
hot water for the slow cooker insert

Instructions

1. Fill the slow cooker insert with water to create a bath for the ramekins (water should come half way or 3/4 way up the sides). Keep in mind that when you put them in, the water level will rise!
2. Pour the condensed milk into the ramekins and put them into their bath.
3. Cover with foil so the condensation doesn’t fall back into the milk (see photos).
4. Turn slow cooker on to high and leave for about 4-5 hours. Adjust timings if your slow cooker tends to cook a little faster. You can check the progress by carefully peeking under the foil. Caramel is done when it has turned the colour of, um, caramel. The longer you leave it, the darker and thicker it will get. Mine is good after 5 hours.

Other cool ideas for your slow cooker
Slow Cooker Jacket (Baked) Potatoes, my most popular post ever
Hot Dogs for a Crowd, by A Year of Slow Cooking
CrockPot Play Dough Recipe, by A Year of Slow Cooking

An Announcement and a “Funky Pie” (with a no bake cookie ice cream cup)

09 Friday Aug 2013

Posted by On Top Of Spaghetti in Dessert

≈ 11 Comments

Tags

caramel, cookie, dessert, digestive biscuits, dulce de leche, funky pie, ice-cream, no bake cookie cup, vanilla, whipped cream

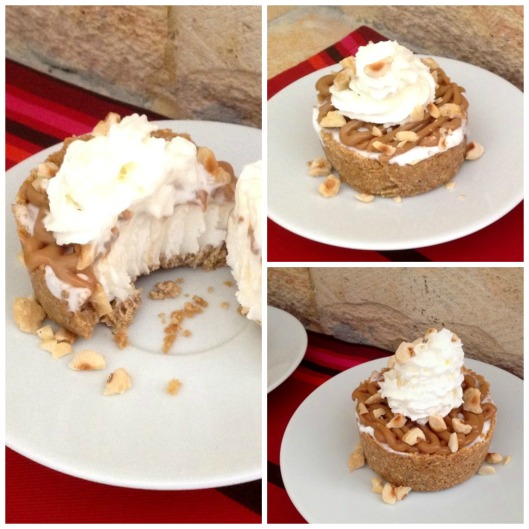
Three photos of a funky pie, one of them opened up to reveal the ice-cream centreYou know back in January when I told you all about my job change? I said I’d give more details about the new venture in due course, then never mentioned anything again. Well. Where to begin? I stayed at the startup for 4 months, during which I gained a whole load of experience and useful knowledge. However, it turned out that the job wasn’t really for me. After much thought and many discussions with The Mister, we decided to consider doing something of our own. However, for both of us to give up paid jobs in order to venture into the great unknown seemed a bit silly. Well, very silly. So, he came up with this idea. Seriously, it was his idea. “Why don’t you become a professional food blogger?” he said. At first I thought I should book a doctor’s appointment for him. But then we talked some more, and some more, and it started making sense. For us it did anyway (if you ask my dad he might disagree). Sure, I will have no income for a looong time, but with The Mister’s support, and some savings, I can concentrate on building up a good blog and maybe even getting some people to read it. There are also a million other ideas swimming around in my brain for all sorts of projects, things I have always been interested in doing, and the great thing is that they can all cozy up under the umbrella of a food blog. For example an e-shop, or an e-cookbook, that sort of thing. Um, obviously all food related.

As we began to put a little plan together, it became apparent that the market I should aim for is the Greek one. So my new food blog is going to be in the Greek language. This may disappoint some of my (very few but loyal) readers, but it’s the sensible thing to do. The global food blogging scene is chockablock full of amazing websites, awesome writers, magnificent food photographers and downright genius recipe developers. Just the thought of trying to compete sends me running for the hills… Not that there aren’t some extremely talented Greek bloggers out there; I hope they’ll welcome me and share their knowledge and experience with me!

So, that’s what going on around here. My new site is being professionally designed and developed (gulp) and is looking really cool. Now I’m in a bit of a panic, trying to get my head together to produce some half-decent content to match the design. It’s crazy scary. But crazy exciting. Wish me luck! Oh and in case you are wondering, On Top Of Spaghetti will continue to exist and I will try my best to post as regularly as possible. If I disappear for a while please be patient, I will surely turn up at some point!

The recipe I’m posting today is something I developed myself, in an effort to copy a dessert I had while out with my auntie in London. We went for a lovely dinner to her local Thai restaurant, somewhere she goes very often with her grandsons. My auntie hates sweets (I know… even ice-cream… I don’t get it…) but she strongly recommended the Funky Pie as it’s what the boys always always end their meal with. Can I just say? My nephews know a good dessert when they see one. I bring to you, my version of The Funky Pie. (I still can’t believe how close I got to the real thing!)

“Funky Pie” with a no bake cookie ice-cream cup

Ingredients

150g digestive biscuits or graham crackers
50g plus 4-6 tsp roasted hazelnuts, chopped (I prepped 100g total and had lots leftover)
70g butter, melted
4 good scoops of vanilla ice cream
4 Tbs dulce de leche or caramel sauce
4 squirts whipped cream from a can (sometimes you just have to go there)

Instructions

1. Whizz biscuits and 50g of chopped hazelnuts in a food processor till fine. Mix in the melted butter and use your hands to incorporate. You want the mixture to hold when you squeeze some in your hand. Sort of wet-sandy texture.
2. Cut 4 strips of grease proof paper, about 4-5cm width. Each strip should be long enough to line the base and two sides of a shallow ramekin with both ends hanging over the sides. You will use this as a handle to pull out the biscuit (cookie) cup when set. Very lightly grease 4 ramekins and line as described (I used the few drops of butter that were left in the saucer after melting it).
3. Put some crumb mixture into each ramekin and press into place with your fingers, along the bottom and up the sides as best you can. The aim is to create a cup which will later hold the ice cream. Pay attention to the corners around the bottom, pressing in with your fingers. This is quite a faffy step, but it’s the only one that requires any sort of effort! So be patient, it’s worth it. Add more biscuit mixture as you work, building up the sides. Note: With this amount of crumb mixture my fourth cup had shorter sides. Pop each ramekin into the freezer as you complete it.
4. Take out the vanilla ice-cream and let it soften for a few minutes. Don’t let it melt, or it will crystallise when freezing again. You want it just soft enough to be pliable and squish-able. Squish it into the biscuit cups inside the ramekins. Put back in the freezer.
5. When ready to serve, pull the paper “levers” up gently so the cup is released from the ramekin. Place on a plate. Spread the top with dulce de leche or caramel sauce. If you want to be fancy you can use a piping bag, unless you are using sauce in a squeezy bottle in which case your life is much easier at this point.
6. Sprinkle chopped hazelnuts on top of the sauce. You can add other nuts here as well, peanuts would probably be nice (salted… to go with the caramel… you know… salted caramel… why did I only just think of that?)
7. Squirt the whipped cream on top of all that. Serve with a fork as well as a spoon, the biscuit can be a bit hard to dig into!

Note: Of course you can use this as a base and let your imagination run riot. Different flavour ice-cream, different sauces (chocolate, sour cherry etc.), different nuts. Whatever you fancy. It’s all good.

Turns out this has been done before..! (but in baked versions)
Chocolate Chip Cookie Ice Cream Cups from Chocolate-Covered Katie (a healthy version)
Chocolate Cookie Ice Cream Bowls by Kirbie’s Cravings
Edible Ice Cream Bowls: Gluten Free Chocolate Chip Cookies by Gluten Free on a Shoestring

Back from #FBC5 with a Greek Yogurt & Chocolate Spread “Cheesecake” in a Glass

04 Sunday Aug 2013

Posted by On Top Of Spaghetti in Dessert

≈ 15 Comments

Tags

cheesecake, choco bella, chocolate, chocolate spread, dessert, digestive biscuits, Greek yogurt, nuts

Head on view of three Greek yogurt and chocolate spread cheesecakes in a glass with hazelnuts and biscuit toppingRemember last post? No? I’m not surprised. It was ages ago (sorry). I was just about to leave for the #FBC5 conference in London. And what a fab experience that was! I think for a food blogger, the best part of going to a food blogger conference is the fact that you can be your true self when confronted with amazing food in a room full of people. In other words, you can whip your iphone out and instagram every single step of that spoonful of chili honey, on its journey from the jar, to the top of the cheese on the cracker, all the way to your mouth. And no one will bat an eyelid. In fact, you might find a line of people behind you, smartphones at the ready, waiting patiently for you to get out of the way so they can do the same.
FBC5_01
FBC5_02
And of course there is all the information that you absorb, a whole load of useful tips, nuggets of advice and wisdom, ideas and suggestions. But the main thing I’ve taken home with me after those three days in the London sunshine, is the fact that I have a whole new bunch of likeminded friends. It was especially great to spend more time with my fellow Greek bloggers, who made the journey from Athens like I did. A total of 5 of us attended, which in my opinion is a huge number for such a small country. Most of them I had met before, but this was a brilliant opportunity to have a natter about our local food blogging scene, and throw about some ideas about how we can do stuff here. It was also quite funny to hear them talk about the pork scratchings they mistook for crisps… let’s just say they were not impressed. They don’t know what they’re missing…
FBC5_03
FBC5_04
The photos here are a collage of my Instagram feed during the #FBC5 weekend. Most are from the actual conference, with a few random London pics in there too. You can also see them on Facebook with a few comments. For a more comprehensive account of #FBC5, the sessions, the food, the sponsors, go over to the website and have a browse through all the related posts. I will just say two things. Chili honey. Maple butter. I dream about them.
FBC5_05
FBC5_06
I was planning on posting a recipe based on one by my new friend Janie over at The Hedge Combers. She is just the sweetest person and I’m so happy to have met her. A kitchen disaster involving falling baking trays and sticky floors made that impossible. Those amazing flapjacks will have to wait just a little longer. Since today is really hot (the air coming through the window is like a hair dryer blowing in your face) I decided to try out something else, which doesn’t involve the oven, but does use one of the goodies that came in our extremely heavy #FBC5 goodie bags. Choco Bella, a fairtrade organic dark chocolate hazelnut spread made by Italian company Damiano. It’s veeery gooood. This “cheesecake” in a glass is dead easy to make, has few ingredients, and is very light (no cream or cream cheese here – just lovely healthy Greek yogurt). The yogurt gives it a slightly tangy taste which goes nicely with the very chocolatey spread. Here goes.
3 Greek Yogurt Chocolate Spread Cheesecakes in a glass placed on a long white plate

Greek Yogurt & Chocolate Spread “Cheesecake” in a Glass

Ingredients

140g digestive biscuits (or graham crackers) + 1 extra biscuit for garnishing (optional)
20g hazelnuts, chopped
2 Tbs melted butter or margarine
200g (3/4 c.) Greek yogurt (I used 2%)
150g (about 7 ½ Tbs) Choco Bella chocolate & hazelnut spread
1 Tbs icing (confectioner’s) sugar

Instructions

1. Crush biscuits in a bowl. You can use your fingers as we aren’t bothered about getting the crumbs very fine.
2. Take 4 small pinches of chopped hazelnuts and set aside for garnishing later (if you want). Mix the rest of the chopped hazelnuts into the biscuit crumbs. Add the melted butter or marge and mix with your fingers till the crumbs are coated. The mixture won’t come together as it would for a cheesecake base, we only want loose crumbs for the glass. Spoon 2 tablespoons of crumb mixture into 4 smallish glasses. Set aside.
3. In a medium sized bowl, combine the yogurt, chocolate spread and icing sugar. I used an electric whisk thinking it might make the mixture fluffier. I don’t know if it did. You can also mix with a regular whisk till incorporated.
4. Spoon 2 tablespoons of mixture onto the crumbs in the glasses. Then add another tablespoon of crumbs on top. Finally, add another layer of chocolate mixture. My last layer was just under 1 tablespoon in each glass. Sprinkle the remaining hazelnuts over the top and garnish with one quarter of the biscuit on each “cheesecake” if desired.

Notes:
– The Choco Bella chocolate spread is quite chocolatey, so if you are using any other brand I would suggest starting with less yogurt (maybe the same quantity as the chocolate spread) and tasting it. Adjust according to your taste buds!

Before I go, a special mention and “lovely to meet you” for a few more bloggers from the event.
Louiza from Chez Foti
Vanesther from Bangers & Mash
Bintu from Recipes from a Pantry
Magda from Midnight Spoon
Madeleine from From the Healthy Heart
Manjiri from Slice off me
Snejana from Orange Thyme
Emma Jane from Cakes and Catwalks
Karin from Yum and More
Karen from Lavender and Lovage

And of course my Greek blogger friends
Artemis from Wonderfoodland (bilingual blog)
Athina from Sugar Buzz (Greek blog)
Nicky from Sugar Flowers Creations (Greek blog)
Elena from Elena’s Cooking (bilingual blog)

Hazelnut & Golden Syrup Rice Crispy Treats and Some “Preparing Ahead” Tips

31 Friday May 2013

Posted by On Top Of Spaghetti in Dessert

≈ 6 Comments

Tags

chocolate, dessert, golden syrup, hazelnut, honey, nut butter, nuts, rice crispies, rice crispy treats, sweet, vegan, vegetarian

Chocolate covered rice crispy treats in the pan ready for freezer
Well, this is new to me. Just diving in and writing about a recipe that is barely even ready to eat. In order to do this, I had to rely on Instagram for my photos, as there was really no time to find the right spot/light/props for each photo I was taking. But let me start from the beginning.

Tomorrow we are having friends round for a barbeque. The next day, we are going to a (different) friend’s house for another barbeque. I always make stuff to take to her parties, as she likes my food and.. well, any excuse for me to make stuff. This time, she has invited around 50 people (it’s a house warming do) and that’s not counting the 15 or so kids. Yikes. My friend has it covered, she always does, as she has a talent for throwing things together that taste lovely, but I would like to help out and do something special in support! Also, my friend and her partner are fitness freaks, so I’m the one who makes the really fattening sweets that their kids are normally deprived of! (just joking… but they do get an extra hit of sugar when I visit).

So after much thought, I set about planning my 3-day weekend. This is an operation that requires much organisation and fine tuning! Today was Day 1 – Prep Day. I don’t like making things too far in advance, as I get anxious about whether they will be good enough to serve when the time comes. But there are many little things that can be done; things that help enormously when it’s time to actually make the final dishes. Here are some tips.

Plan. Make a note of what you are cooking. If you’re like me, write them down, then cross at least two off the list. Try and include some things that can be made ahead, or at least have some steps that can be completed beforehand. Check you have the recipes, and check what ingredients you have/need. Then, do the shopping list.

Next, make yourself a schedule. I am a fan of schedules, so that’s not too difficult for me. I don’t mean down to the last 5 minutes of your day. But think about all the things you will need to do, like supermarket (allow for botched credit card machines and shops that don’t have rice crispies..), other irrelevant tasks that might take time (catching up on Twitter and Facebook), and a break for lunch.

An important part of the schedule are the “make ahead” steps for each recipe. For example. Salad. You think, I can’t possible make it a day in advance. True, but you can wash the veggies. And mix your dressing and keep it in a jar in the fridge. That has just saved you more than half the prep time on the day. Are you baking? You can probably bake a day in advance, especially brownies! But if you don’t want to do that, go through the recipe and complete any steps you can. For example, measure and mix the dry ingredients and keep them in an airtight container. Measure the butter or oil, chocolate, beetroot (brownies on my mind again) and mix if the recipe tells you to. It might seem that all this is unnecessary, but I find that measuring out ingredients is the most time consuming of all stages in baking. But that’s me! Label your containers so you know what’s what.

small tupperware containers with measured ingredients for baking

One has pieces of Twix in it!

For tomorrow’s BBQ, one of the things I’m making is a pasta salad. Again, I could probably have prepared the whole thing today, they are usually better the next day anyway, but mine will have raw courgettes (zucchini) in, so I don’t want it to get very watery overnight. So, I boiled the pasta, coated it in olive oil and it’s now patiently waiting in the fridge. The only downside to these methods, is the full-to-the-brim fridge, and the washing up of all the containers! But desperate times call for desperate measures! The dishwasher can do most of the work.

Collage, one photo of red peppers draining in the sink, and one of a courgette next to a dish sponge

If you are wondering what the sponge is doing next to the courgette, read on..

Finally, if you have a lot planned, splurge on something you wouldn’t normally, to save time and energy. For example, I am making a potato salad on Sunday. I like it with new potatoes, the little ones. My supermarket does these packets of pre-washed new potatoes that need 7 minutes in the microwave. Definitely worth the extra money. Pre-cut and washed salads are also life savers, although these can be much more expensive and not cost effective for a large number of guests. Washing lettuce though? One of my pet hates.
Collage, one photo with courgettes and the other salad stuff drying

At this point I would like to share another couple of tips, which have nothing to do with planning. As mentioned above, lettuce. Love to eat it, hate washing it. I do however have a good method that keeps it fresh for quite a while. If you’re eating it the same day or the next, chop (after getting rid of the outside leaves), put in a colander, wash and leave in the colander to drain, shaking up at regular intervals to get rid of water. If you’re keeping the lettuce for a bit longer, peel off the leaves whole (disgard the outside ones), wash them and spread them out on some kitchen paper to dry. Try to shake as much water off first, but be careful not to bruise the leaves. Do something else for a while. When they are just about dry (don’t leave too long as they will wilt), layer them in an airtight container with kitchen paper between the layers. Yes, I use lots of kitchen paper. If you have chopped the lettuce, pop a sheet of… kitchen paper in a zip lock bag, add the lettuce and seal, trying to push as much air out as possible without crushing the salad. Gosh, how long can one talk about lettuce…?
Collage of two photos with lettuce, one in a tupper the other in a bag

Courgettes/zucchini. Have you ever started to wash them only to find tiny prickly invisible hairs on them? Keep a clean dish sponge (the one with the rough green side used for pots) in your draw. Use it to lightly scrub the zucchini skin. You can also use it to scrub potatoes, if you want to cook them in their skins. You probably already knew that…

And now, a recipe. A recipe I never imagined would be this good. This is my own version of Chocolate Covered Katies’s 5 Ingredient Rice Crispy Treats. They can be stored in the freezer, so I decided to make them today. They’re for the kids on Sunday. Well, they were until I tasted them. Now I think the kids can have the beetroot brownies and the grown-ups will have the Rice Crispy Treats. The Hazelnut & Golden Syrup Rice Crispy Treats. Or maybe I won’t take them with me at all…
Collage of photos with preparation of rice crispy treats

Hazelnut & Golden Syrup Rice Crispy Treats

Ingredients

1/2 cup (8 Tbs) hazelnut butter (in the UK this is available at Holland & Barrett)
1/2 cup (8 Tbs) golden syrup (you could use honey, unless vegan)
1 tsp sea salt
2 tsp vanilla extract
3 1/2 cups rice crispies or similar puffed rice cereal (mine was the Lidl brand – use an appropriate version if you are vegan)
160g dark chocolate, cut into pieces
1 Tbs golden syrup
Optional: 1 Twix Xlarge bar (42.5g), cut into small pieces (I had one left over, it was either that or eat it..)

Instructions

1. Place the hazelnut butter, syrup, salt and vanilla in a small saucepan and warm over low heat till melted and combined.
2. In a large bowl, combine rice crispies and hazelnut butter mixture. Stir gently and patiently with a spatula till all the rice crispies are coated.
3. Transfer mixture to a baking tin lined with grease-proof paper. Put another piece of paper over it and press down on it with your hands or the bottom of a glass. Press down well making sure you get into the corners. Put the tin in the freezer for about 20 to 30 minutes.
4. In the meantime, melt the chocolate and 1 Tbs of syrup in the same saucepan you used earlier, over low heat, stirring constantly. When it’s melted, add the Twix pieces and stir until these too have melted. You will have some lumps from the biscuity part of the Twix.
5. Spread evenly over the rice crisy base and return to the freezer till the chocolate topping sets. Use the parchment paper to lift out the set mixture, carefully cut it into pieces (won’t be very easy!) and store in the fridge (or return to freezer). They would also be fine at room temperature (unless you are here in Greece) for a few days.

A sliver of rice crispy treat

A sliver, just to taste test!

Other Rice Crispy Treats from around the blogosphere
50+ Rice Krispie Treat Recipes from Something Swanky (need I continue?!)
Rocky Road Rice Krispies Treats from Brown Eyed Baker
Homemade Coconut Luna Bars from V. K. Rees Photography
Beetroot Brownies for Jamie’s Food Revolution Day Picnic

27 Monday May 2013

Posted by On Top Of Spaghetti in Cakes and Baked Goodies, Dessert

≈ 4 Comments

Tags

baking, beetroot, brownies, cake, chocolate, dessert, picnic

a stack of beetroot brownies on a pretty white plate with pointy cornersHello there! It’s been a while… again. But I have a good excuse! We’ve moved house. Yup, we now live in an area outside the city on the coast – a 5 minute walk from the beach to be exact. For Athenians this is considered “a village”! Oh but it’s so lovely. See? a little palm tree on a lawn next to a sandy beach The move was an experience. I’ve moved house several times in my life, 9 to be exact – not counting my years at University in England and not counting the time when I was little and we started moving to a flat up the street only to find the fridge didn’t fit through the kitchen doorway. My mum just took everything back to the old flat that same day! I must say, this time was very easy. We hired professionals to do all the work; packing, dismantling, transporting, the works. The hardest part for us was trying to stay out of their way. Check out their fantastically clever wardrobe box! a cardboard box with a rack for hanging clothesAfter all 9,000 boxes were brought to the new house however, that’s when the tricky part for us started. Two weeks later and I’ve managed to get rid of all but four of them. Unfortunately, one of these contains my tupperware; it doesn’t fit in the kitchen, and I can’t live without it. So I have several trips to IKEA planned in a quest to find the right storage contraption. Any excuse to go get a hotdog!

A few days after the move, I got a message from a Greek food blogger friend (Wonderfoodland) inviting me to a picnic she and two other bloggers (Funky Cook and Sabor by Conna) were organizing for Jamie Oliver’s Food Revolution Day. FRD is an initiative to help raise awareness about eating healthy meals made from scratch. I had to choose from a list of fresh ingredients and make something to take with me. Luckily beetroot was on the list, so I got to try something I’ve been meaning to for a while now. Beetroot brownies! I used a recipe I found on Milk & Honey, which is very easy and requires a minimum of cooking utensils (crucial for me at the time). The only thing I did differently to the original recipe was leave it to bake for longer, as I wanted a more “cakey” brownie rather than a very fudgy one (easier to eat while sitting on a blanket in a park!). What a great day it was! It was so cool to meet fellow bloggers who are based here in Greece, I really hope to see more of them in the future. As with all foodies, they are a supportive and welcoming bunch, always ready with a good word!

picnic shots of brownies, savoury tart, pasta salad and cherry pie

Photos by Wonderfoodland

Beetroot Brownies for Jamie’s Food Revolution Day Picnic

Ingredients

250g unsalted butter
250g dark chocolate
250g cooked beetroot (I use the vacuum packed type – make sure it’s not preserved in vinegar!)
3 eggs
250g white sugar
1/8 tsp salt
150g self-raising flour

Instructions

  1. Preheat the oven to 180C (or 160C on fan mode). Grease a baking tin and line it with grease proof paper, making sure the paper overlaps the long sides (creating a handle to pull out the brownies when cooked). My tin is 18×24.5cm (7×9.5”).
  2. Place the butter and chocolate in a bowl and melt in the microwave (in 30 second blasts, mixing after each blast). Alternatively, melt in a small saucepan over low heat, keeping a constant eye on it so it doesn’t burn. Let cool slightly.
  3. Cut the beetroot into pieces and whiz in a food processor until smooth. Set aside.
  4. In a large bowl beat the eggs and sugar till well combined and lighter in colour.
  5. Add the chocolate mixture to the eggs slowly, while mixing constantly. Be careful if your chocolate is still very hot, you don’t want to cook the eggs!
  6. Sift the flour and salt over the bowl and fold it in carefully.
  7. When almost no flour is visible, fold in the beetroot until just incorporated. Don’t overmix. The batter will be quite runny.
  8. Pour the batter into the tin and bake for 35-40 minutes if you want fudgy brownies, or about 50 minutes for cakey brownies. After 50 minutes my toothpick came out dry from some spots, slightly moist from others.
  9. Let the brownies cool in the tin for 10 minutes or so, then lift out using the paper “handles” and place on a wire rack. Mine were gorgeously moist (not gooey), even with the extra baking time.

Instead of other beetroot recipes, I am listing a few of the blogs that participated in the picnic. There were several more but I didn’t get a chance to chat with them. Take a moment to visit these guys; they are doing a fantastic job!
Wonderfoodland (picnic organiser) – posts in both English and Greek (her savoury tart with feta, tomatoes, onion and olives is pictured above – recipe not online yet)
Sabor by Conna (picnic organiser) – posts in both English and Greek
Funky Cook (picnic organiser) – posts in Greek
Elena’s Cooking (picnic attendee) – posts in English (Pasta Salad with Zucchini pictured above)
Donkey & The Carrot (picnic attendee) – posts in both English and Greek (Cherry Pie pictured above)
Food Daily (picnic attendee) – posts in Greek

For more photos of yummy picnic food, or in case you really want to “Like” it, head over to the Food Revolution Day Athens page!

A Glass of Dessert Part 3 – Lenten (and Vegan) Chocolate Mousse

03 Friday May 2013

Posted by On Top Of Spaghetti in Dessert

≈ 18 Comments

Tags

chocolate, coconut milk, honey, Lent, mousse, tahini, vegan

A martini glass with chocolate mousse garnished with sesame seeds around the rim

Antique English spoon dating from the late 1800s, on kind loan by The Collector

It’s Good Friday today, a day of strict fasting in Greece. It is really hard to believe this chocolate mousse is actually allowed. But it is. I, however, would make this any day of the year. Out of all the chocolate mousses I’ve tried, this might just be the best. And not a raw egg in sight!

I give you two versions and two methods of preparation. The original version, adapted from an insert in Ta Nea newspaper (Feb 2012), uses honey and a food processor. Honey is allowed during Lent even though it comes from bees; this is not the case with veganism. So, I thought I would make it again replacing the honey with golden syrup, making it suitable for vegans. This time I also ditched the processor, purely because I couldn’t be bothered to wash it. Surprisingly, this actually made a big difference in the texture of the mousse, and produced a much softer, lighter and well, mousse-ier result. The original is very smooth and dense, and might be better described as a chocolate pot de crème. Taste-wise they are very similar and I can’t choose which one I like more. But texture-wise, my own version wins hands down. You’ll just have to make a double batch, one of each, and decide for yourself!
Lenten and Vegan Chocolate Mousse 2

Lenten Chocolate Mousse – The Original (with Honey)

Adapted from Ta Nea insert Feb 2012
Makes 4

Ingredients

1 c. coconut milk (not cream, not water)
100g dark chocolate, chopped
3-4 Tbs honey
2 Tbs tahini
1/8 tsp cinnamon
sesame seeds and slivered almonds to garnish

Instructions

  1. Heat the coconut milk in a small pan till just below boiling point.
  2. In a food processor, whiz the chocolate pieces with the cinnamon.
  3. Add the warm coconut milk to the processor, along with the honey and tahini, and whiz till it froths up. Be careful, the warm milk might make it froth up too much, or even overflow and make a mess everywhere. That might put you in a bad mood.
  4. Empty the mixture into 4 glasses or small bowls, let cool and refrigerate till set (at least 3 hours).
  5. Garnish with the sesame seeds and serve. To get the margarita effect in the photo, I put some golden syrup on a plate, twirled the rims of the glasses through it, and then twirled the rims round a plate sprinkled with sesame seeds.

Note: The recipe in the newspaper used almond milk instead of coconut. I haven’t tried this; if you try it please come back and let me know what it’s like!

Lenten and Vegan Chocolate Mousse – My Version

Adapted from the same recipe
Makes 2

Ingredients

1/2 c. coconut milk
40g dark chocolate, chopped
2 Tbs golden syrup
1 Tbs tahini
a pinch of cinnamon
sesame seeds to garnish

Instructions

  1. Heat the coconut milk in a heat-resistant measuring jug in the microwave (in 15 second bursts, checking after each burst).
  2. When hot, add the chopped chocolate and stir till melted.
  3. Add the tahini and golden syrup and whisk till incorporated.
  4. Add the cinnamon and continue to whisk till smooth.
  5. Poor into glasses, let cool and refrigerate till set.
  6. Garnish and serve.

Other Chocolate Pot or Mousse Recipes
Instant Chocolate Mousse by Nigella Lawson (tried, tested and loved!)
Chestnut Chocolate Pots by Nigella Lawson
Chocolate Mousse with Olive Oil and Sea Salt by The Kitchn (also tried and tested; gorgeously interesting and different)

← Older posts

Click to follow me and get all my new posts delivered to your inbox!

The Foodie Corner logo

Search Other Food Blogs

Proud member of FoodBlogs
noimage
FBC5 Alumni Badge
Foodista Food Blog of the Day Badge

Categories

  • Breakfast (8)
  • Cakes and Baked Goodies (13)
  • Dessert (18)
  • Dips, Spreads, Chutneys (6)
  • Dukan Diet Friendly (16)
  • Fish & Seafood (5)
  • Meat (18)
    • Beef (9)
    • Chicken (4)
    • Pork (5)
    • Turkey (4)
  • Meatless (18)
  • Pasta (5)
  • Pies, Quiches, Frittatas (5)
  • Slow Cooker (17)
  • Soup (4)
  • Uncategorized (1)

Most Viewed

  • Easy Bougatsa (Greek Custard Pie)
  • Beetroot Brownies for Jamie's Food Revolution Day Picnic
  • Stuffed Courgettes (Zucchini) with Egg Lemon Sauce – My Slow Cooker Success
  • Artichokes A La Polita – Slow and Not So Slow
  • An Announcement and a "Funky Pie" (with a no bake cookie ice cream cup)

Favourite Food Blogs

  • A Year of Slow Cooking
  • Brown Eyed Baker
  • Food In Jars
  • In Jennie's Kitchen
  • Kalyn's Kitchen
  • Slow Cooker From Scratch
  • The Kitchn
  • The Perfect Pantry
  • The Stone Soup
  • Two Peas and Their Pod

Horses. My other passion

  • Haynet – Equine Social Blogging Network
  • Ride With No Eyes
  • School Your Horse

Archives

  • June 2014
  • May 2014
  • March 2014
  • January 2014
  • December 2013
  • November 2013
  • October 2013
  • September 2013
  • August 2013
  • July 2013
  • June 2013
  • May 2013
  • April 2013
  • March 2013
  • February 2013
  • January 2013
  • December 2012
  • November 2012
  • October 2012
  • September 2012
  • August 2012
  • July 2012
  • June 2012
  • May 2012
  • April 2012
  • March 2012
  • February 2012

RSS Links

  • RSS - Posts
  • RSS - Comments

Now on Facebook!

Now on Facebook!

Meta

  • Register
  • Log in
  • Entries feed
  • Comments feed
  • WordPress.com

Blog at WordPress.com.

Privacy & Cookies: This site uses cookies. By continuing to use this website, you agree to their use.
To find out more, including how to control cookies, see here: Cookie Policy
  • Follow Following
    • On Top Of Spaghetti
    • Join 142 other followers
    • Already have a WordPress.com account? Log in now.
    • On Top Of Spaghetti
    • Customize
    • Follow Following
    • Sign up
    • Log in
    • Report this content
    • View site in Reader
    • Manage subscriptions
    • Collapse this bar
 

Loading Comments...